Lab: Vulnerability Scanning
exploration via nmap and nessus
- Kali
- Metasploitable2
- Read the section here on how to launch the Metasploitable2 virtual machine within Kali.
- Ensure that you can
pingMetasploitable2 from Kali, and Kali from Metasploitable2, before continuing the lab. - Use the addresses shown in the infosec-net network map.
The objective of this lab is to create a report of potential vulnerabilities for a virtual machine. The VM is a Ubuntu-based Linux distribution called MetaSploitable2, which is specifically designed to teach penetration testing skills such as vulnerability scanning.
During the lab, you may envision yourself as a defender, checking an organizational assets for vulnerabilities visible from an external perspective with the ultimate intention of patching them. Alternatively, you may envision yourself as an attacker, checking a target victim asset for vulnerabilities, with the ultimate intention of exploiting them. Both defenders and attackers may perform the same steps of vulnerability scanning.
Troubleshooting
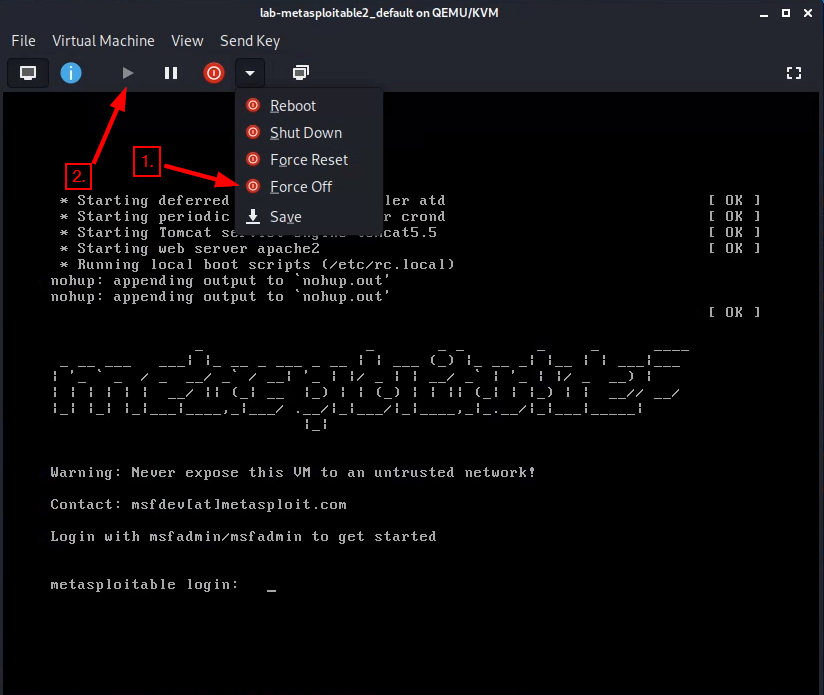
Metasploitable2 is an ancient operating system. It is prone to crashing and otherwise behaving unexpectedly suddenly. If Metasploitable stops responding during the lab, then try force-off’ing it and starting it up again:
Part 1. Host Discovery and Scanning using NMAP
NMAP is the de facto standard of host discovery and port scanning and has a host of features that make the tool very robust. In this section of the lab, you’ll try a few of NMAP’s features.
<IP.addr.of.metasploitable2> with the actual IPv4 address of Metasploitable.- Open a “Terminal Emulator” window in Kali.
- Run all nmap commands as root – you’ll get more information as root for some commands.
- “Get root” in your shell (i.e.,
sudo -sorsu root).
- “Get root” in your shell (i.e.,
- Run
nmap. Take a quick look at the available options. -
Use
nmapto determine whether the your Metasploitable2 VM is live using a “ping scan”:nmap -sn <IP.addr.of.metasploitable2>The ping scan not only sends an ICMP request, but also an ARP ping, TCP pinging, and other techniques to determine if a host is live on the network.
Question : What kind of information is shown when you run this ping scan for Metasploitable2?You could also scan a range of IPs using CIDR block notation. See the network map for the ipv4 block of the infosec-net network. This can be fun to do if you also have your vulnerable Windows 7 vm running at the same time, although this is not required.
nmap -sn <ipv4 CIDR block>You can know your network by typing
ifconfigon either Kali or Metasploitable2, and looking for theinetaddress plus themaskvalue on the same line. For example, a “mask” of255.255.255.0applied to an “inet” address of 192.168.56.17 translates to a network of 192.168.56.0/ 24. (Where 24 is the number of bits to mask and it takes 8 bits to make 255, 8x3=24, so that would mask three of the ‘.’ blocks.) -
Once you determine that a host is live, you can use NMAP to scan for open ports. Use a TCP scan to determine which ports are open on Metasploitable2:
nmap -sS <IP.addr.of.metasploitable2>This scans approximately 1,800 of the most common TCP ports on the target machine.
Question : Which ports are open on the Metasploitable2 VM? -
You can also specify additional ports to scan. Scan the first 10,000 ports of the Metasploitable2 VM:
nmap -sS -p1-10000 <IP.addr.of.metasploitable2>Question : Did you find any additional ports? -
Nmap can provide additional information about open ports by interrogating the ports it finds using the “sV” flag:
nmap -sV <IP.addr.of.metasploitable2>Note: Press the “enter” key to see a status of the NMAP scan.
-
You can get further information still by using the aggressive flag (“-A”), which is a kitchen-sink of sorts.
nmap -A <IP.addr.of.metasploitable2>Question : What additional information about the open ports on Metasploitable2 were you able to obtain by using the -sV and -A flags? -
A useful feature of nmap is operating system fingerprinting, which it accomplishes by profiling how a system responds to its scans.
nmap -O <IP.addr.of.metasploitable2>Note: That’s a capital “oh” not a “zero.”
Question : What operating system does nmap report Metasploitable2 to be? -
Now scan for web applications on Metasploitable2. Metasploitable2 has many intentionally vulnerable web apps. A web “application” is a loose term for a distinct website, or app, that runs over
http. Applications may run off of different base URL paths, all sharing the same port, such as port 80 – but web apps can run off of any port.nmap -sV --script=http-enum <IP.addr.of.metasploitable2>The scan will list, for a given port, many different
/paths/that the scan found to return HTTP responses. You can browse these ports and paths in Kali’s web browser. For instance, if a scan of 192.168.56.102 reported that the path/tikiwiki/was found running on port4454, then the app could be investigated by entering the following address in a web browser address bar:192.168.56.102:4454/tikiwiki/
(Recall that specifying a
:portafter an address changes the default for for a given protocol, and that the default protocol that a web browser tries ishttp, which hsa a default port of80.)Feeling adventurous? Use a web browser to visit the/dvwapath off of Metasploitable2's ip address. You'll find an intentionally vulnerable web app. Default username/password is on the bottom of the page.Question : What web applications are available on Metasploitable2?
Part 2. Vulnerability scanning using Nessus
In this part of the lab, you will use Nessus, a product by Tenable, to replicate what you did with nmap using a tool used in industry. According to Tenable:
Nessus is trusted by more than 30,000 organizations worldwide as one of the most widely deployed security technologies on the planet - and the gold standard for vulnerability assessment.
Access the Nessus Scanner
Nessus should already be installed on your Kali-on-GCP instance. It should also already be running, and pre-registered. You can either log in using existing credentials (Option A), or you can reset and reregister Nessus (Option B).
Option A: Log in using existing credentials
-
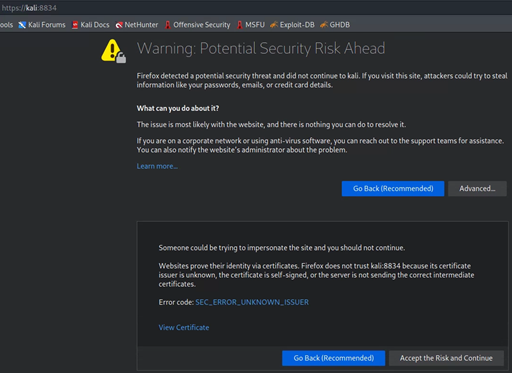
Open Firefox on Kali and browse to https://kali:8834.
To proceed past the SSL warning, click ‘Advanced’ > ‘Accept the Risk and Continue’.
- If Nessus is not running, try running this command in the console:
sudo systemctl start nessusd.service - You can see if it is running using this command:
sudo systemctl status nessusd.service
- If Nessus is not running, try running this command in the console:
-
Log in with username:
rootand password:toor
Option B: Reset Nessus so you can enter a registration code
With this option, you will have to wait for plugins to recompile, which can take a while.
- Stop Nessus (if it is running):
sudo systemctl stop nessusd.service - Reset Nessus (type
ywhen prompted):sudo /opt/nessus/sbin/nessuscli fix --reset-all - Start Nessus:
sudo systemctl start nessusd.service - Access Nessus: https://kali:8834
- Select “Register for Nessus Essentials”
- Proceed to perform an online registration.
-
Submit a valid email address to receive a free registration activation code on the following page.
If the product registration prompt on the https://kali:8834 webpage does not provide you with an activation code once you have submitted a valid email address, you can get a registration code by visiting the Tenable Nessus Essentials product page.
Submit your registration code on the https://kali:8834 page.
- Choose any
username:passwordyou prefer for use with nessus. For instance, you could use userrootpasswordtoorwhen prompted by Nessus. Click “reload” if the page fails to load.
Run a Nessus Scan
-
Click the “Scans” tab and press the “New Scan” button.
-
Choose “Basic Network Scan”
-
In the “Name” field, enter “Metasploitable2” or something more cool-sounding. In the “Targets” field, enter the IP address of the MetaSploitable2 VM.
-
Under the category “Discovery,” change the “Scan Type” to “All ports.”
-
Under “Assessment”, change the dropdown to “Scan for known web vulnerabilities.”
-
Under “Advanced”, select Scan Type “Custom”. Then select “General” on the left. Uncheck “Enable safe checks,” and (Important!) set “Max number of concurrent TCP sessions per host” to 100.
- Disabling “Safe Checks” tells Nessus that it’s okay to run scans that might crash the systems being scanned. A user would want to leave safe checks enabled if they were scanning a production network!
-
The latter setting about limit number of concurrent TCP sessions prevents Nessus from crashing the infosec-net virtual network adapter (see this Nessus forum post for amusing anecdotes about Nessus scans crashing corporate firewalls).

-
Click the “Save” button, then click the “Scans” tab at the top of the web page. Next, on row of the Metasploitable2 scan you just created, click the triangle “play” symbol to launch the scan .
-
In the Scans tab you should see the scan job running. This should take about 10 minutes to complete. In the meantime, you can click the job to see the vulnerabilities that Nessus has found so far. Vulnerabilities can be sorted by severity.