Lab: Digital Certificates and Trust
Understanding digital certificates and their drawbacks
- Kali
Part 1: Understanding Digital Certificates
A digital certificate “is essentially a public key accompanied by a signature of that key and associated information” (Aumasson 2018, Serious Cryptography). For TLS (X.509) certificates, this information includes the domain name, optionally alternative domain names that a cert is valid for, issue and expiration dates, and other details.
Examining details of IBM.com’s Certificate
Browse to ibm.com and inspect the certificate details. For example, in Firefox:
- Click on the padlock icon in the URL bar.
-
Click on the arrow to the right of the domain name.
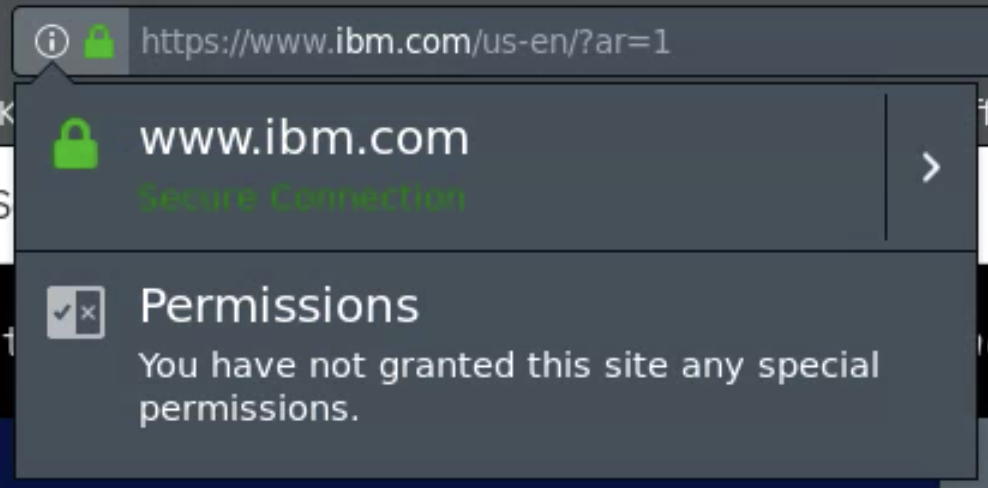
- Click on “More Information”
-
Click “View Certificate”
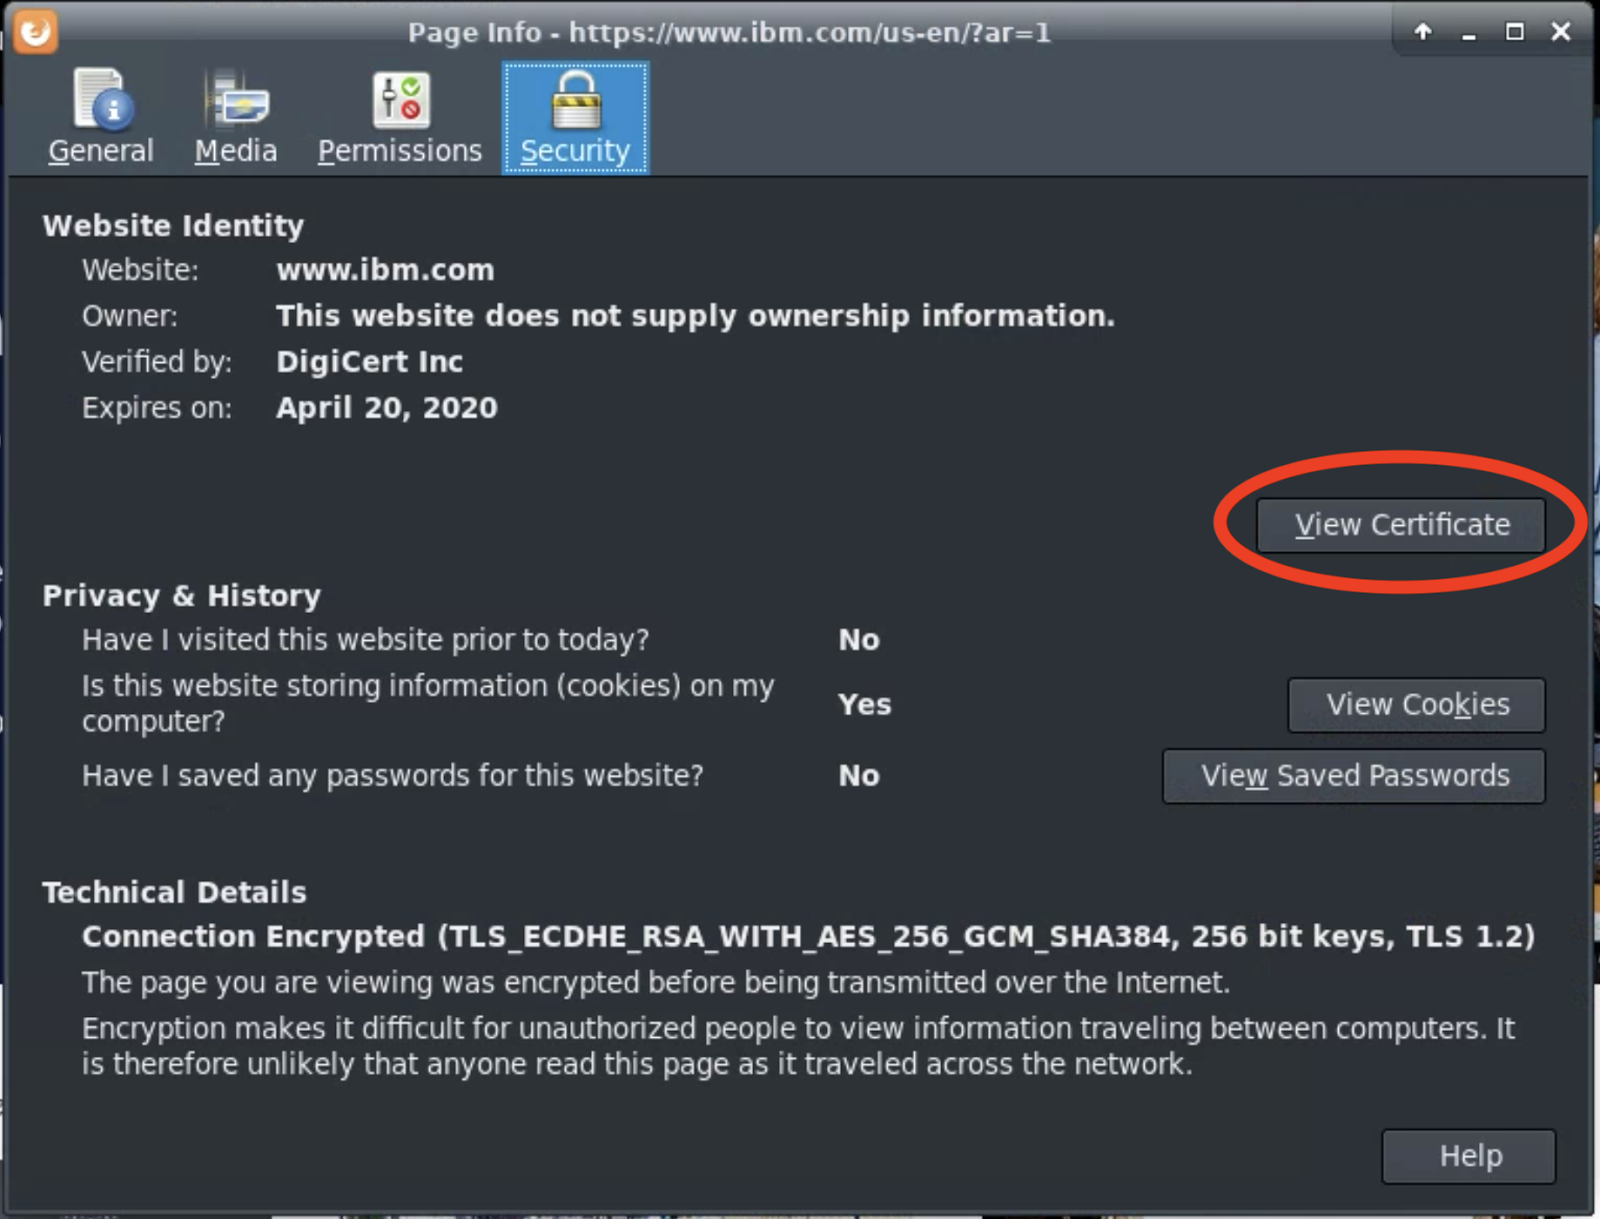
- Click on the “Details” tab.
The purpose of an intermediate authority is the following:
“Every publicly-trusted Certificate Authority (such as Let’s Encrypt) has at least one root certificate which is incorporated into various browser and OS vendors’ (e.g. Mozilla, Google) trusted root stores. This is what allows users who receive a certificate from a website to confirm that the certificate was issued by an organization that their browser trusts. But root certificates, by virtue of their widespread trust and long lives, must have their corresponding private key carefully protected and stored offline, and therefore can’t be used to sign things all the time. So every Certificate Authority (CA) also has some number of “intermediates”, certificates which are able to issue additional certificates but are not roots, which they use for day-to-day issuance” (Let’s Encrypt 2020).
What are some of the other domains for which this certificate is valid?’ In Firefox, these are listed under “Certificate Subject Alt Name.”
For TLS X.509 certificates, the signature in the certificate is signed by the public key included in an intermediate or root certificate authority certificate (see figure below). An intermediate certificate, if any, is signed by the public key included in a root certificate. The root certificate is signed using the public key in its own certificate (a self-signed certificate). Linking certificates in this way forms a certificate chain.
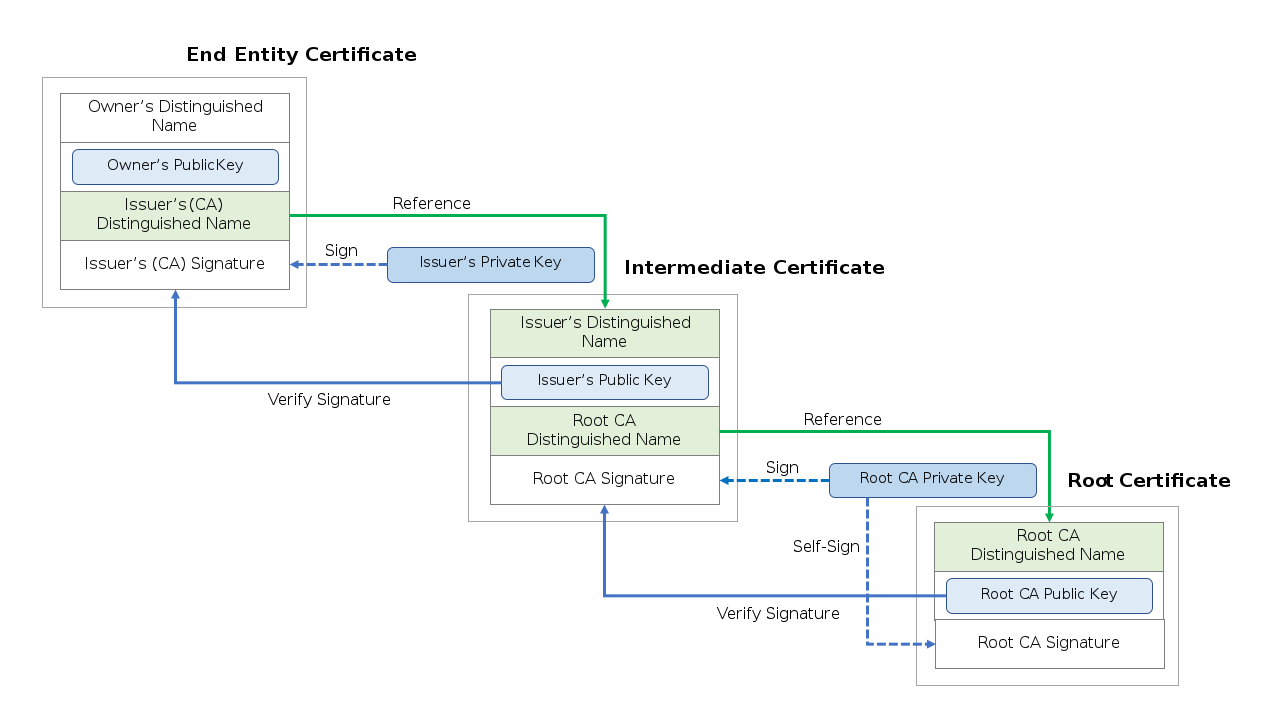
Certificate chain image from Wikipedia
Root Certificate Authorities
The goal for this section is to navigate to Firefox’s list of certificate authorities. The exact steps vary depending on the version of Firefox and on the operating system. However, the instructions below should work for the version of Firefox running on the labs’ Kali.
-
In your Kali VM, open Firefox.
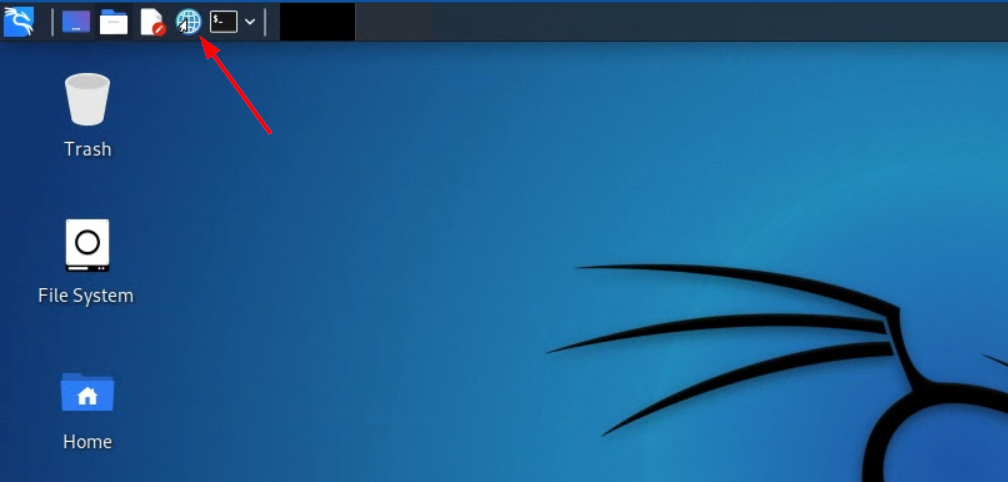
-
Click on the “hamburger” icon in the top-right, and select “Preferences”.
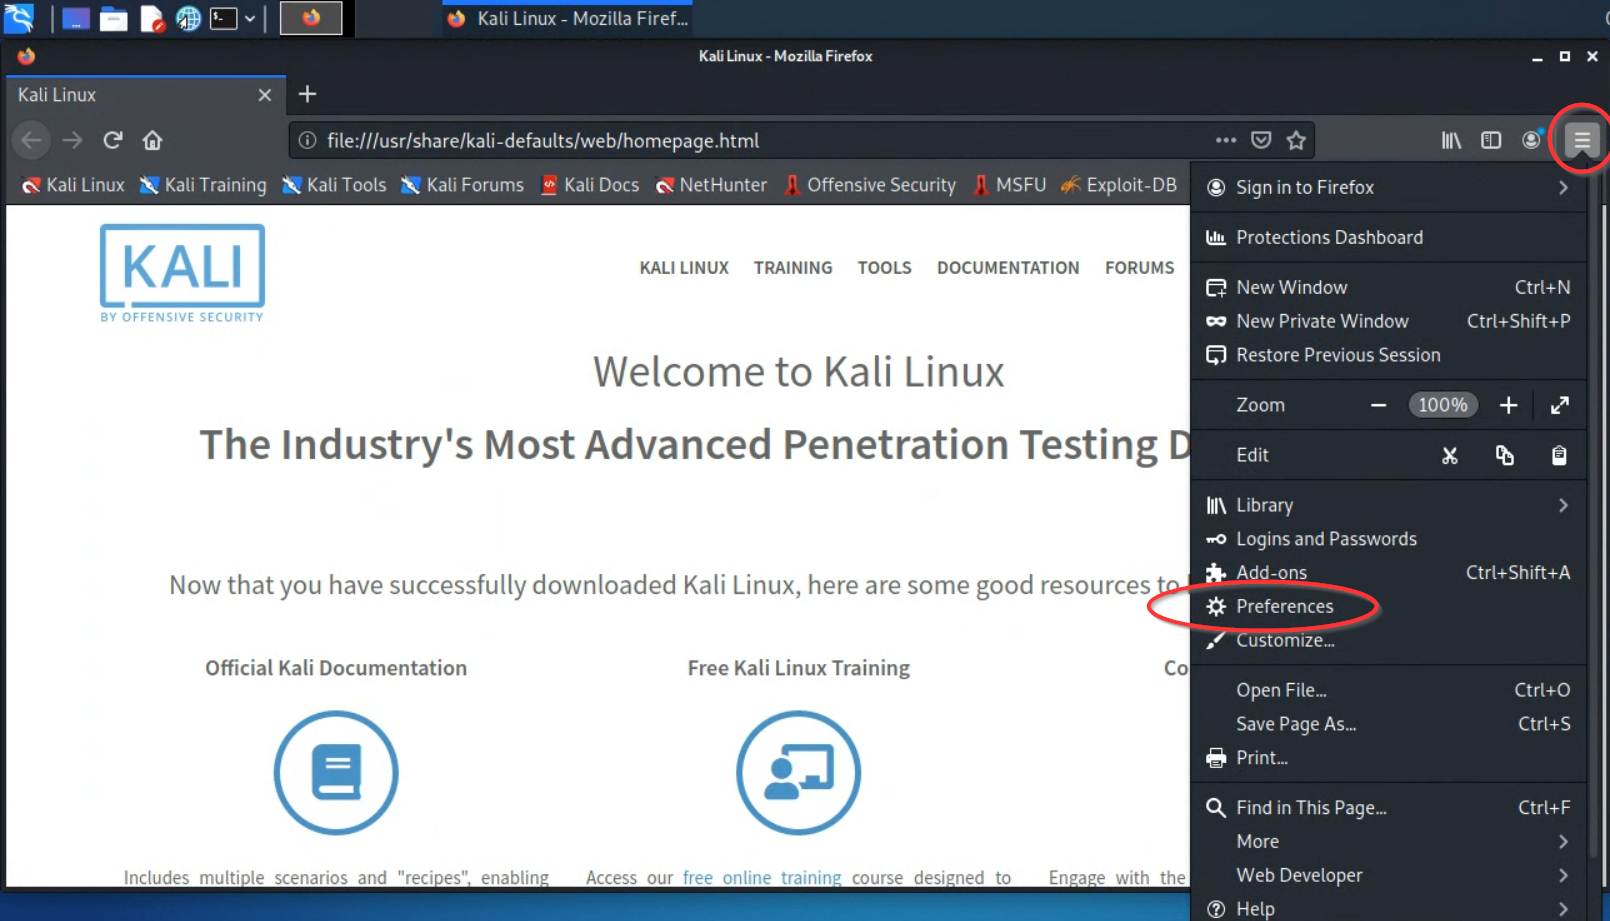
-
Use the settings/preferences search bar to find the “View Certificates” button. Click it.
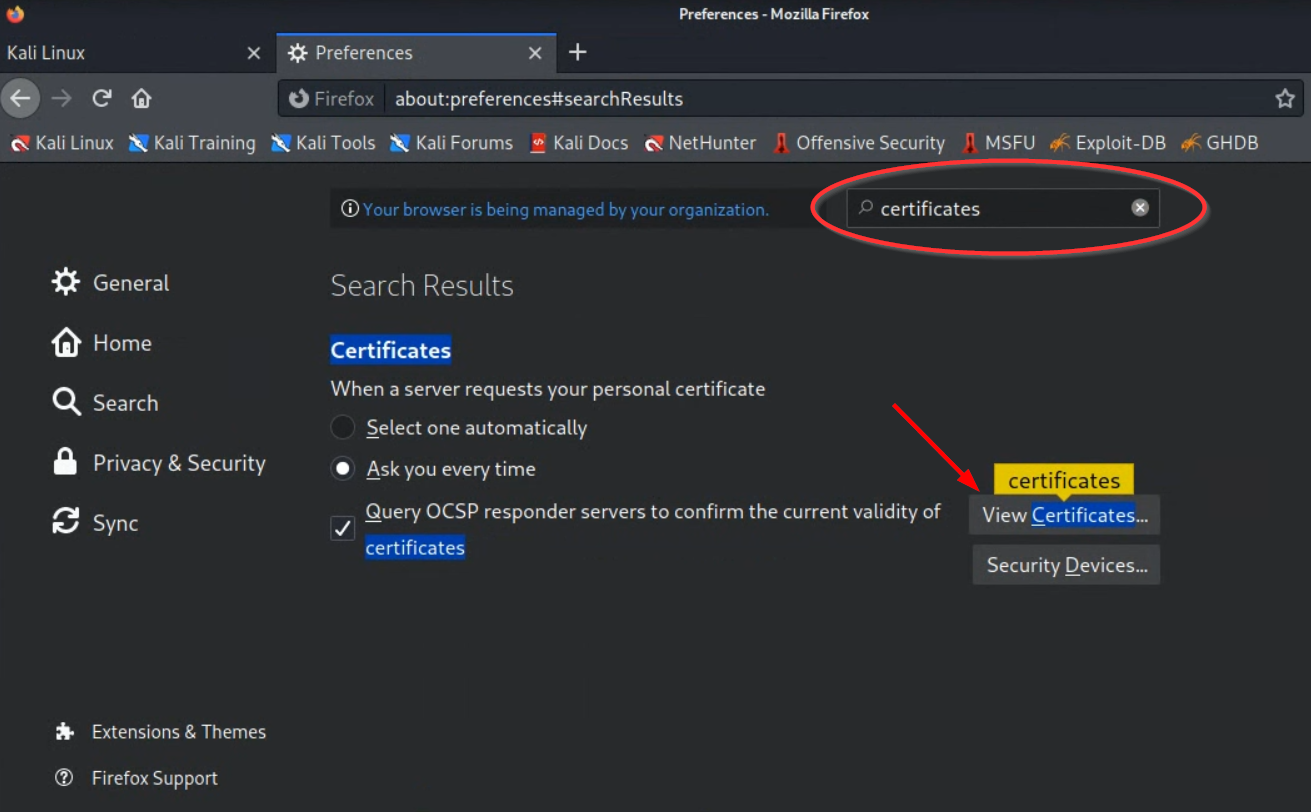
(Alternatively, find the “View Certificates” button by selecting the “Privacy & Security” tab and scrolling down a ways.)
-
Under the ‘Authorities’ tab, find the “DigiCert Global Root CA” certificate that was ultimately used to verify the authenticity of IBM’s certificate. Click “Edit Trust.”
Question : What can this DigiCert root certificate be used for? -
Now find any of the root certificates for Symantec Corporation. Select one and click “Edit Trust.” What can this Symantec root certificate be used for? What can it not be used for? Examine other certs in the list to see what a “normal” cert in Firefox’s store can do.
Question : What can this Symantec root certificate be used for?
Why is the trust for Symantec’s cert anomalous?
To help you answer this question, look at one or more of the following resources:
- https://security.googleblog.com/2017/09/chromes-plan-to-distrust-symantec.html
- https://arstechnica.com/information-technology/2017/03/google-takes-symantec-to-the-woodshed-for-mis-issuing-30000-https-certs/
- https://blog.mozilla.org/security/2018/03/12/distrust-symantec-tls-certificates/
Untrusted Root CA
Firefox ships with a few certificates that are untrusted and that are untrustable. They are for former CA DigiNotar. Why does Firefox distrust certs signed by DigiNotar?
To help you answer this question, look at one or more of the following resources:
- Darknet Diaries Podcast, episode 3: “DigiNotar, You are the Weakest Link, Good Bye!
- https://slate.com/technology/2016/12/how-the-2011-hack-of-diginotar-changed-the-internets-infrastructure.html
- https://security.googleblog.com/2011/08/update-on-attempted-man-in-middle.html
Perfect Forward Secrecy
- On any computer with Google Chrome installed (your Kali VM does not have Chrome), browse to https://static-rsa.badssl.com
-
From the hamburger icon in the top right-hand corner, select “More Tools” > “Developer Tools.”
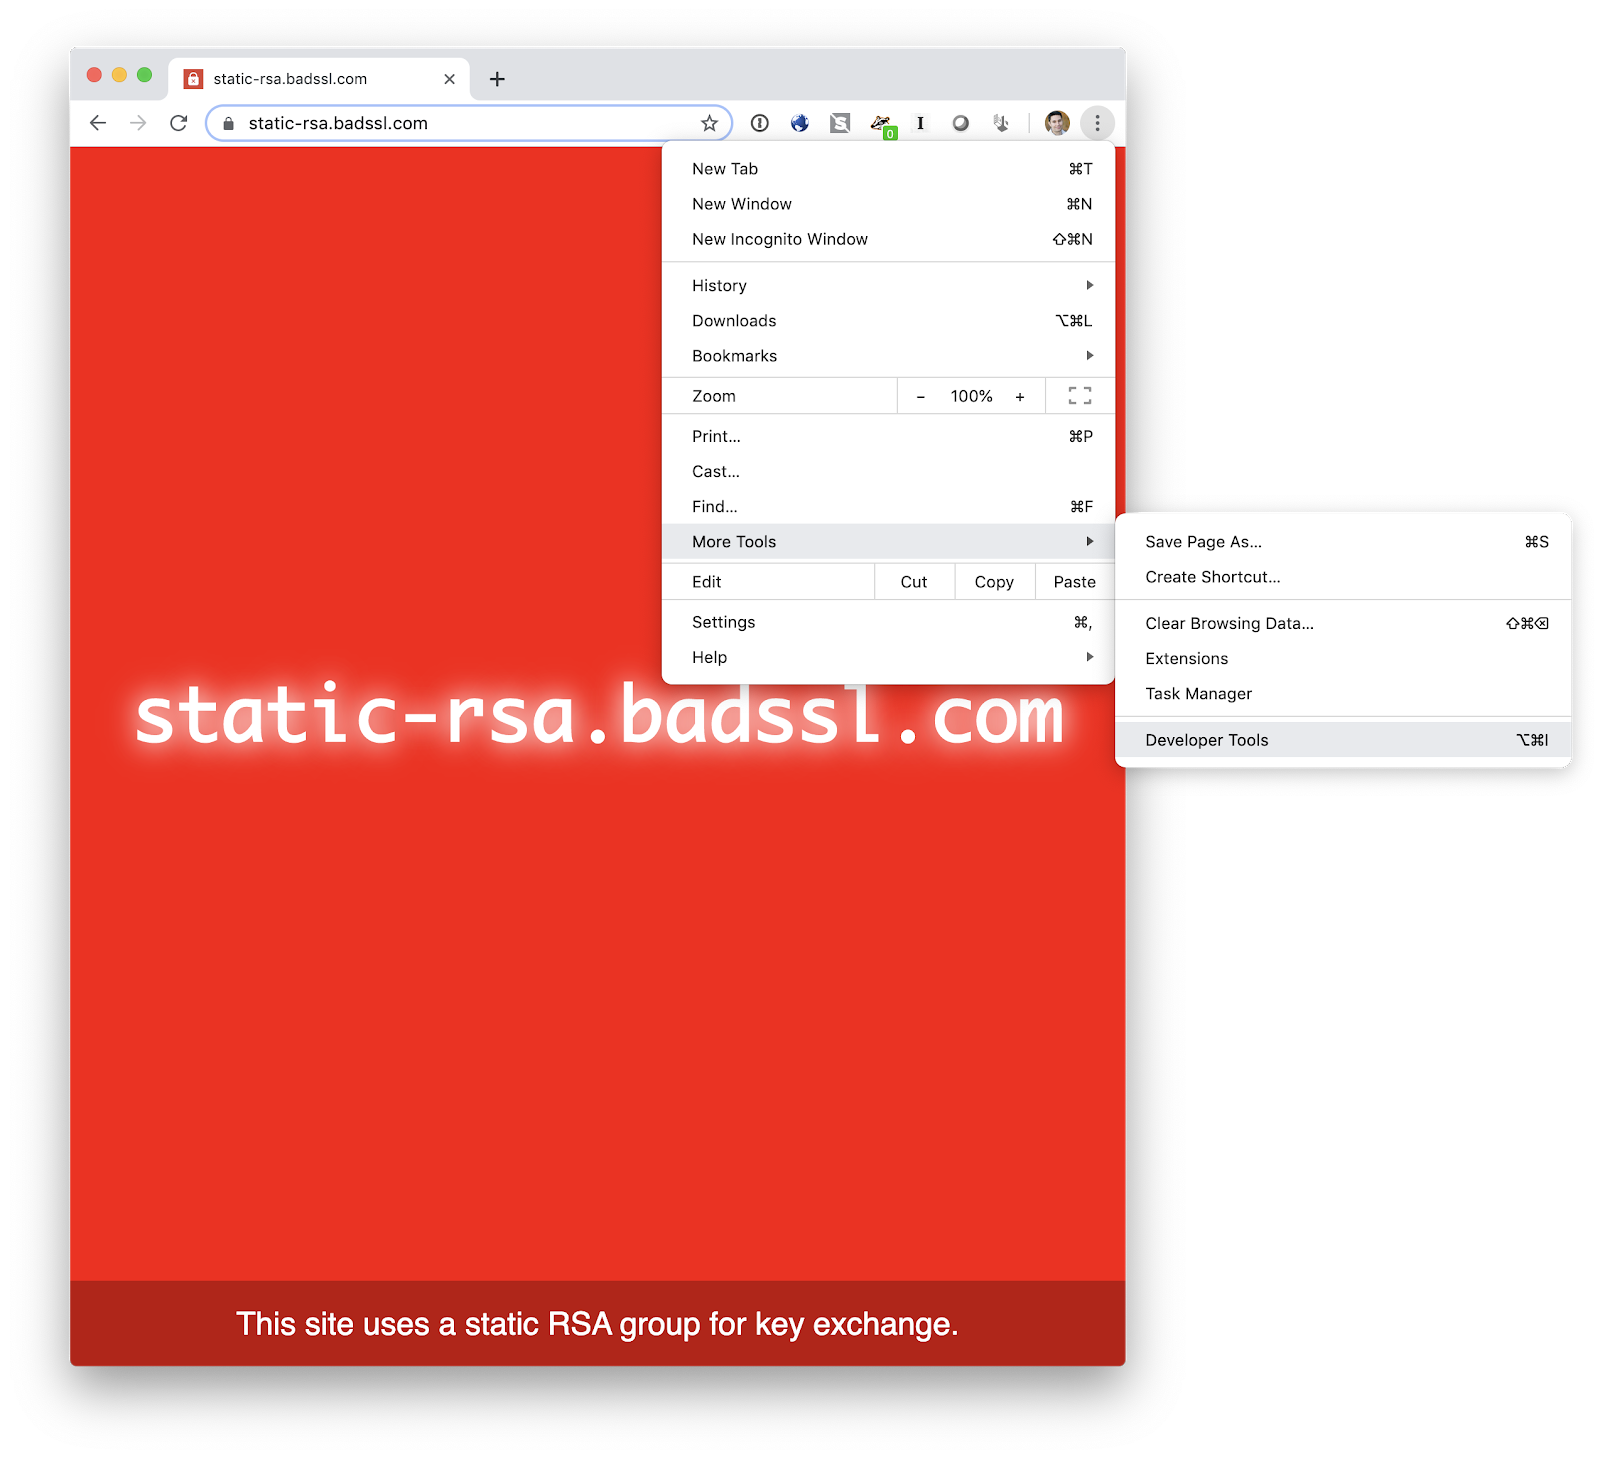
-
Select the “Security” tab from the Developer Tools. This tab displays details about the connection. What does Chrome say about the connection settings for RSA key exchange, and why?
To help you answer this question, look at one or more of the following resources:
- https://www.wired.com/2016/11/what-is-perfect-forward-secrecy/
- https://scotthelme.co.uk/perfect-forward-secrecy/
- https://en.wikipedia.org/wiki/Forward_secrecy
- https://www.zdnet.com/article/google-moves-forward-towards-a-more-perfect-ssl/
Question : What does Chrome say about the connection settings for RSA key exchange, and why?
Part 2: MITM with Burp Suite
In this section, you will configure Firefox on Kali to route all network traffic through a tool called Burp Suite. You will feign a Man-in-the-Middle (MITM) attack and intercept a username|password that you submit to https://bankofamerica.com.
Burp Suite is a network traffic proxy application created by PortSwigger. The tool can be used by developers and researchers to inspect and manipulate any network traffic to which Burp Suite has access. It is commonly used in the cybersecurity community for inspection and manipulation of web requests. See articles such as this one which rely on Burp Suite for analysis of a smartphone app’s web requests. This lab uses the free Burp Suite Community Edition. Alternatives to Burp include mitmproxy, Fiddler, ZAP, and Charles.
Configure Burp Suite as a proxy
-
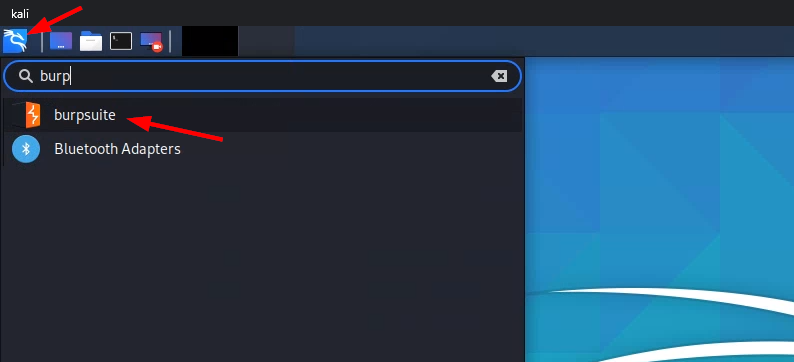
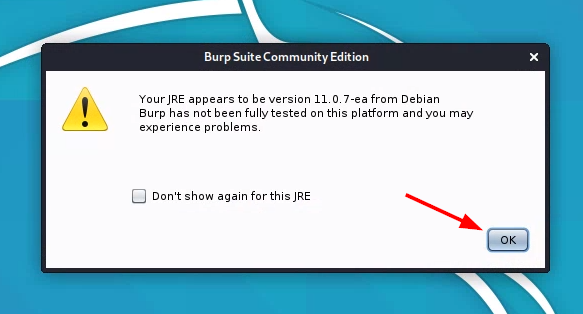
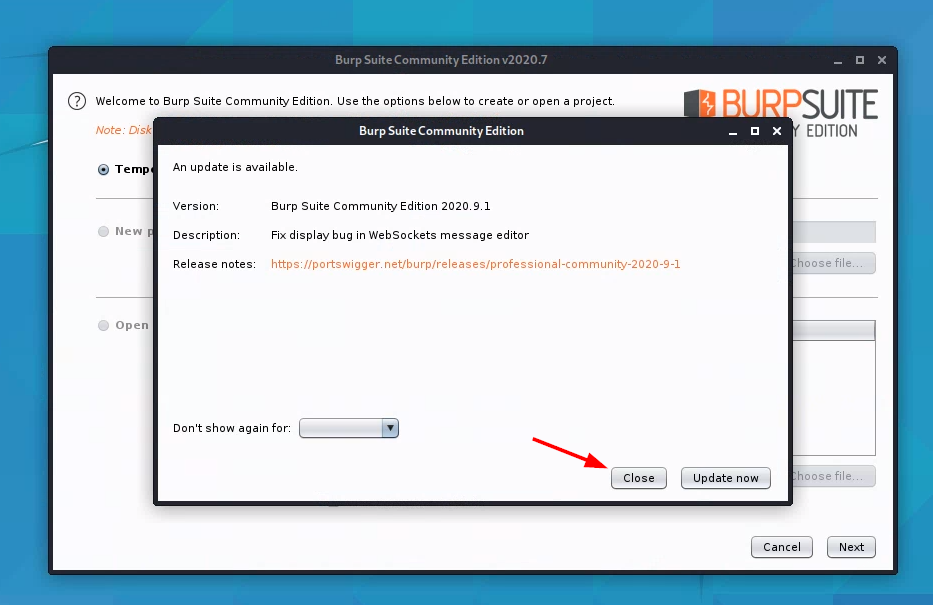
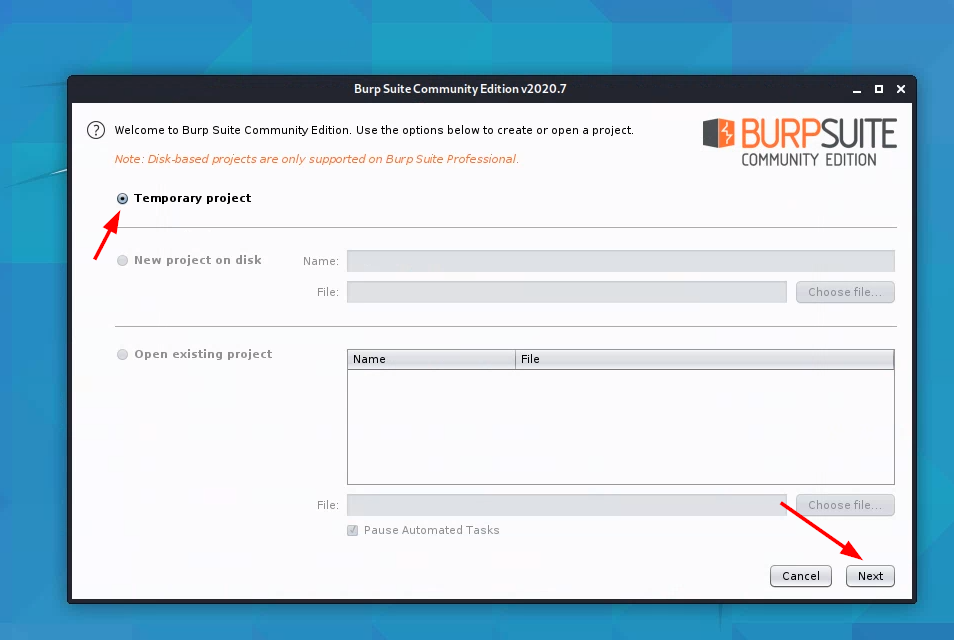
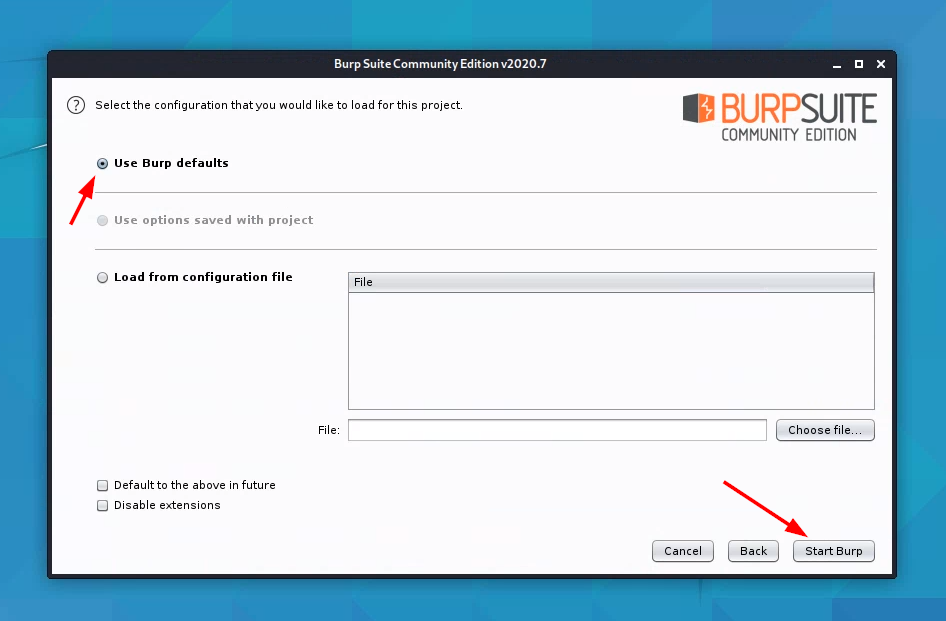
Launch Burp Suite. Follow the steps displayed below to get through the launch process.
-
When Burp Suite is started, it by default “listens” for incoming traffic on
localhost:8080, as shown below. Leave this as-is.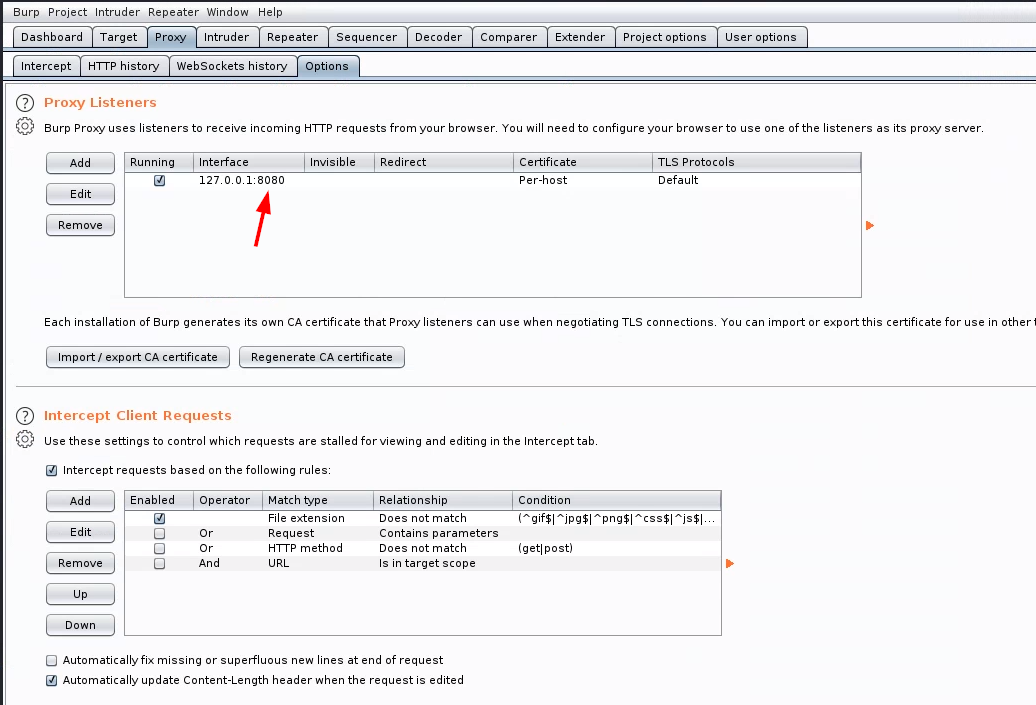
-
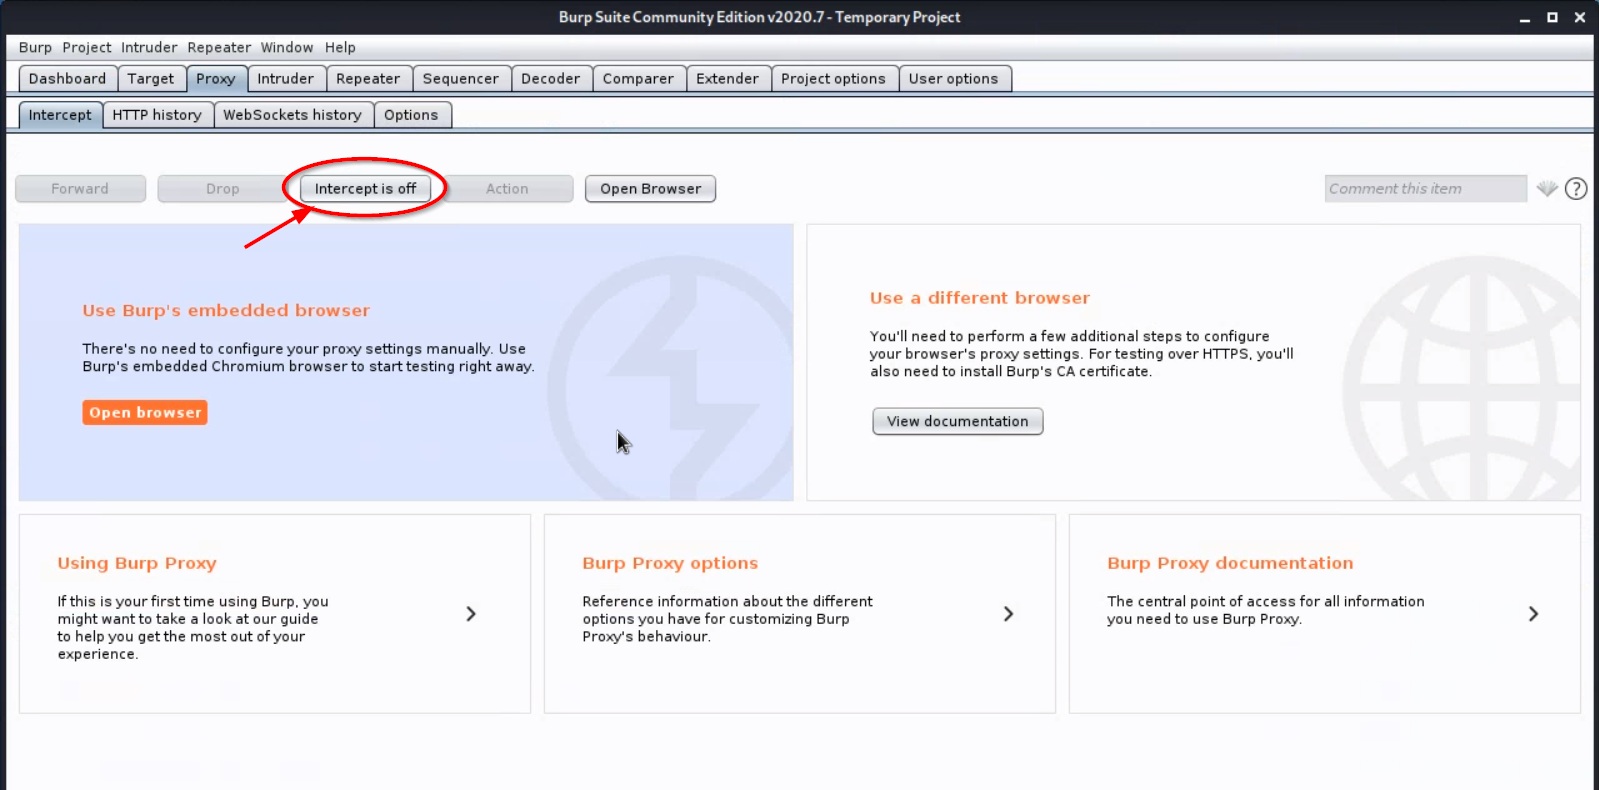
Turn off interception from the “Proxy” > “Intercept” tab. Interception is used when the goal is to modify requests before they are sent on their way. The goal of this section of the lab, however, is to show that https traffic can be readily decrypted if a MITM attack is successful.
-
Configure Firefox to route all internet traffic through Burp Suite.
-
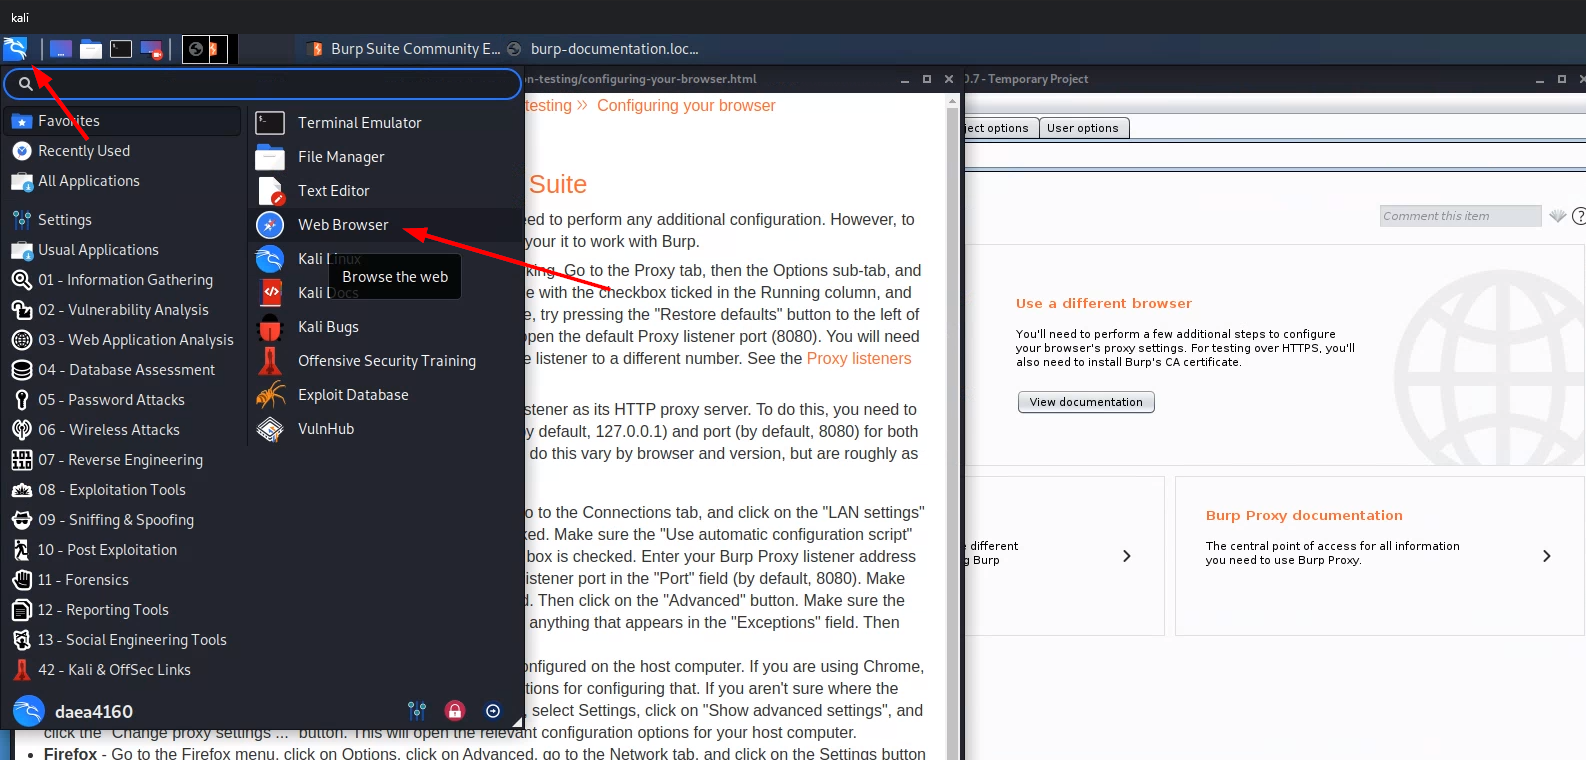
Open Firefox, if it’s not open already.
-
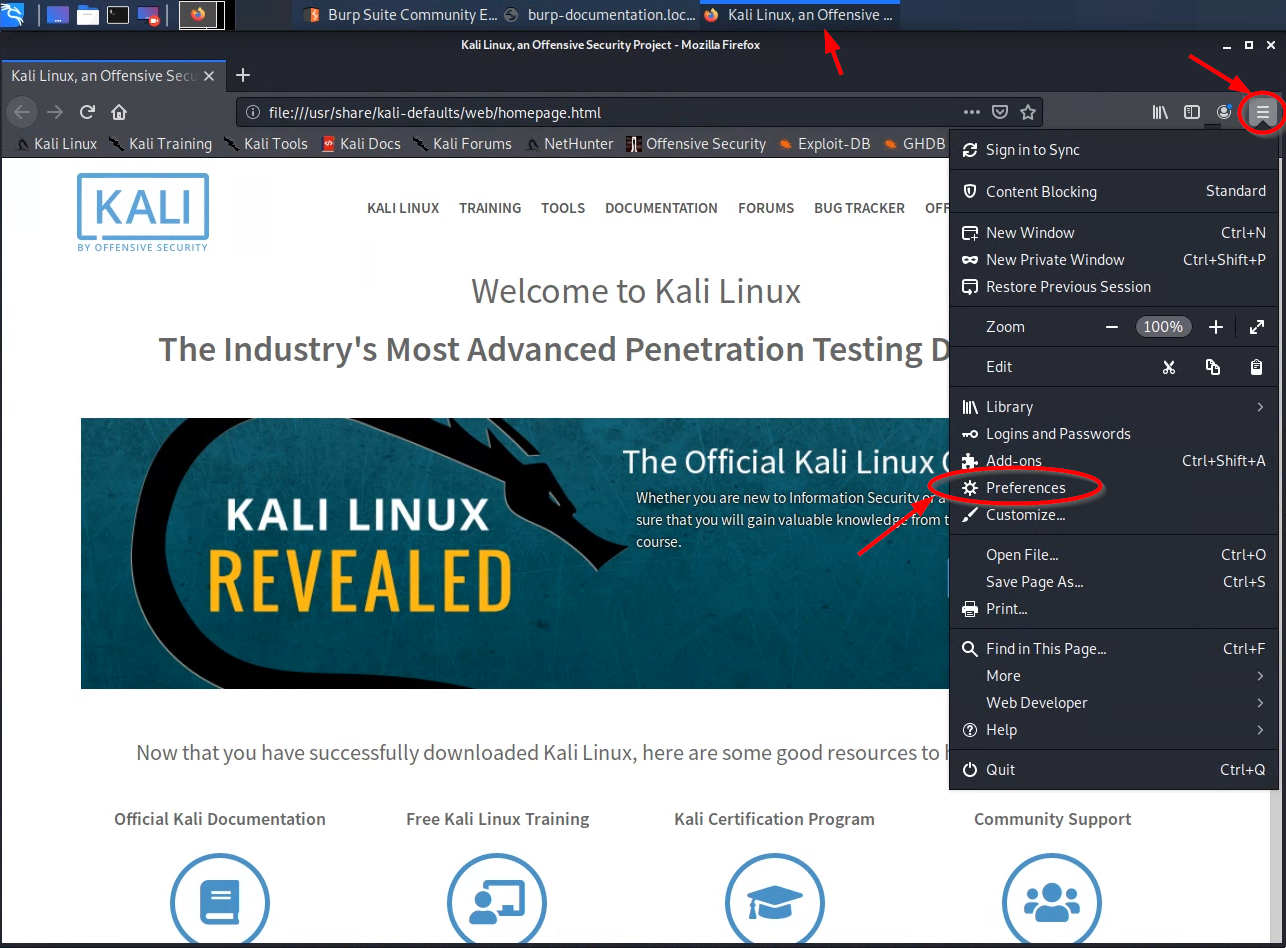
Click Firefox’s “Hamburger” menu icon on upper-right, then open “Preferences”
-
Within the preferences view, navigate to the “Network Settings” (scroll to the bottom or search, as shown below):
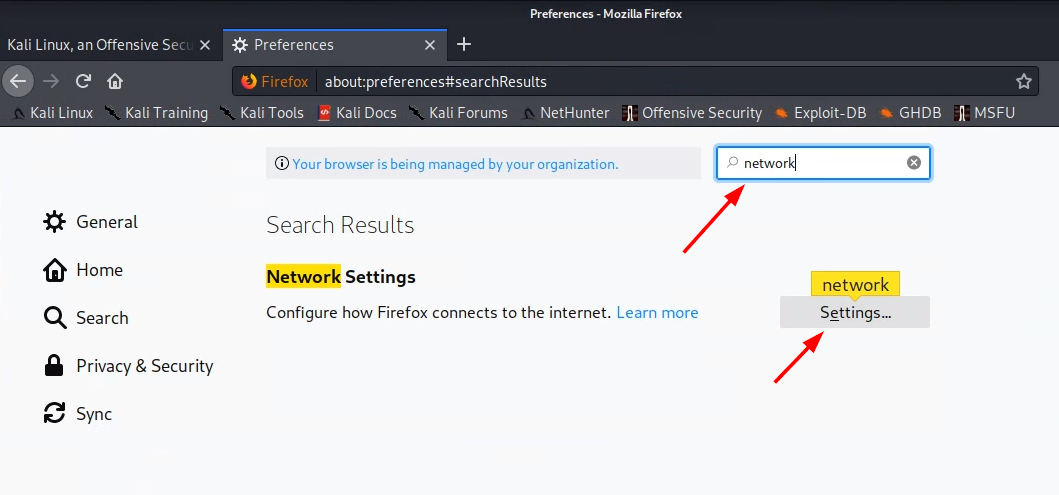
-
Choose a “Manual proxy configuration”, with “HTTP Proxy
localhost” (or equivalently127.0.0.1), Port8080. Check the box for “Also use this proxy for FTP and HTTPS”.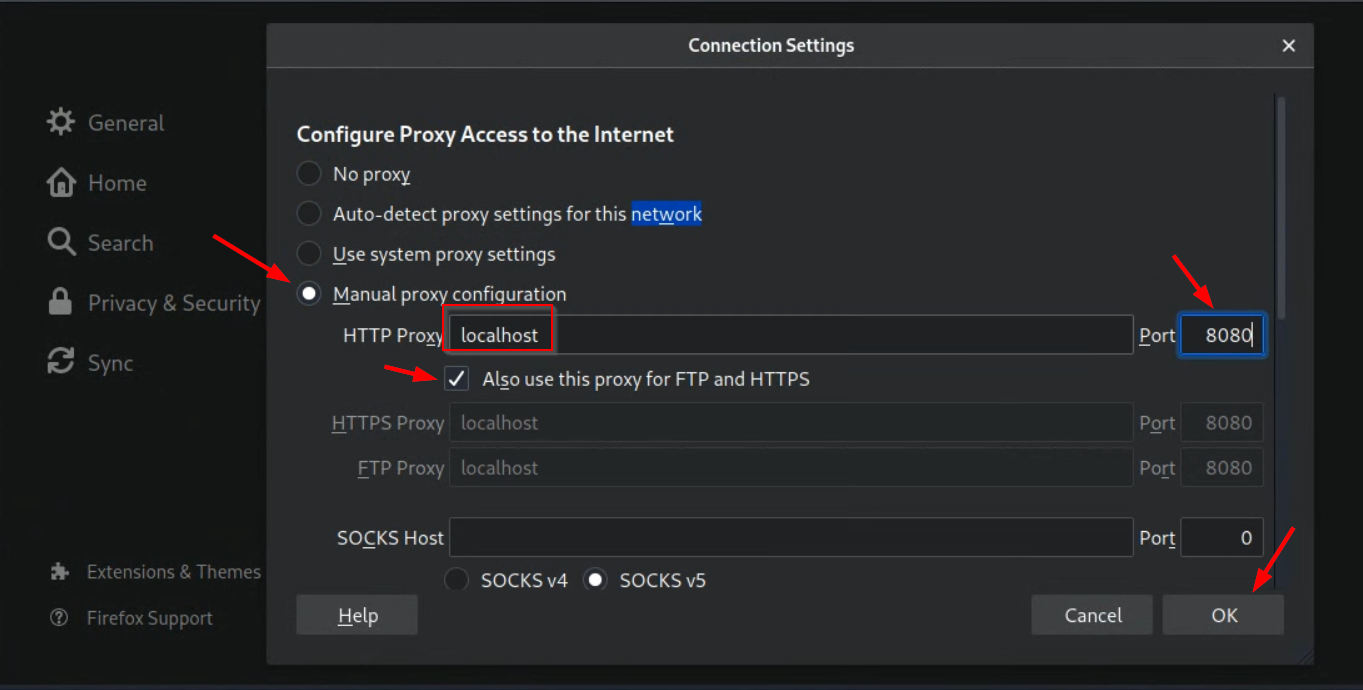
Firefox is now proxying all web requests through Burp Suite.
(Note: the above instructions are also described on a Burp Suite documentation page, accessible from the Burp Suite dashboard:)
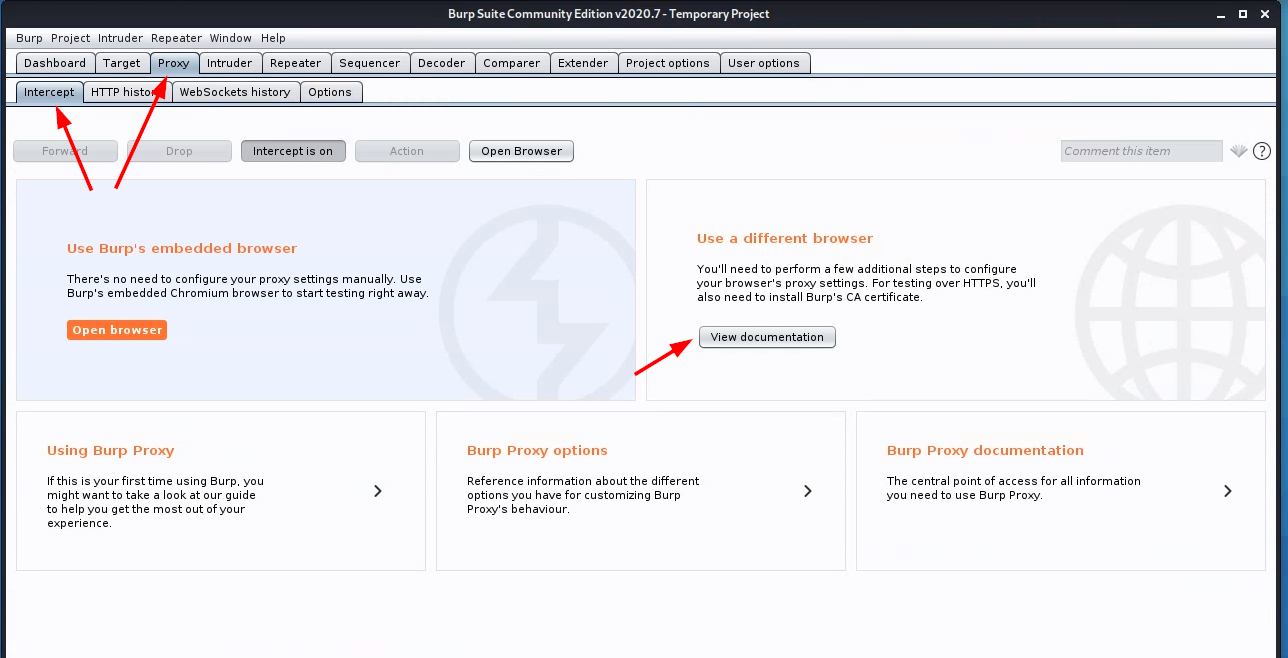
-
Attempt to visit a secure website
-
Now that Firefox is passing all traffic to Burp Suite, try to visit a website that uses https. The following steps would work against any https site, but we will visit https://bankofamerica.com
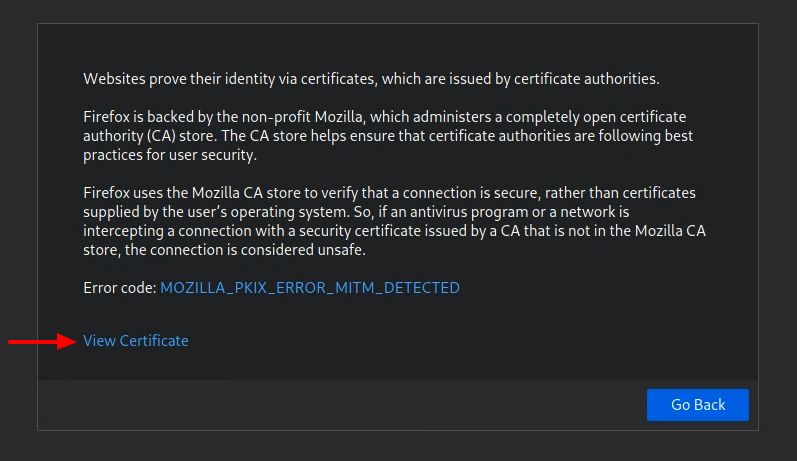
You receive an SSL connection error!
-
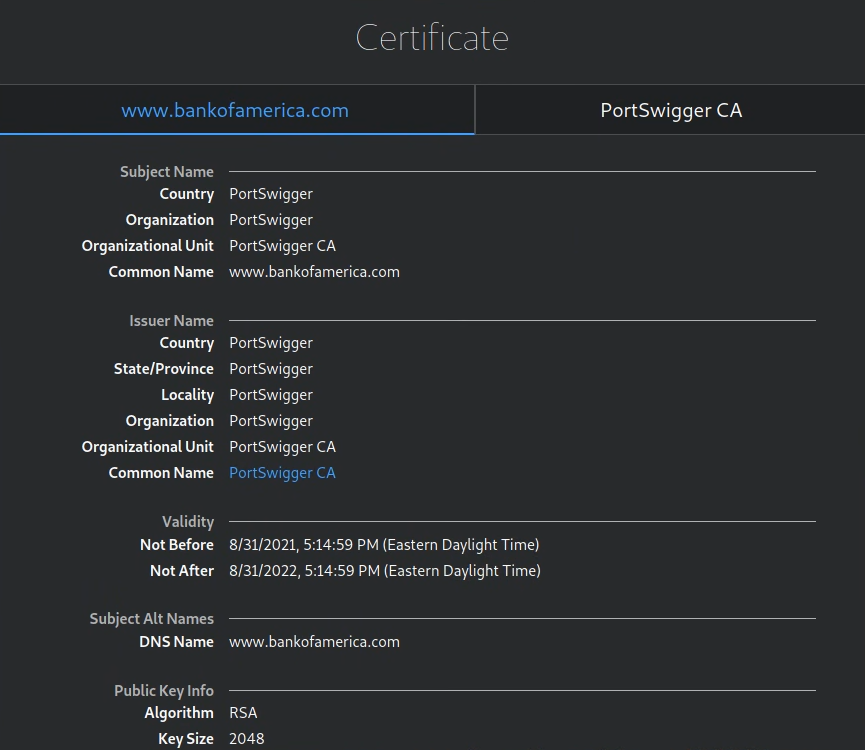
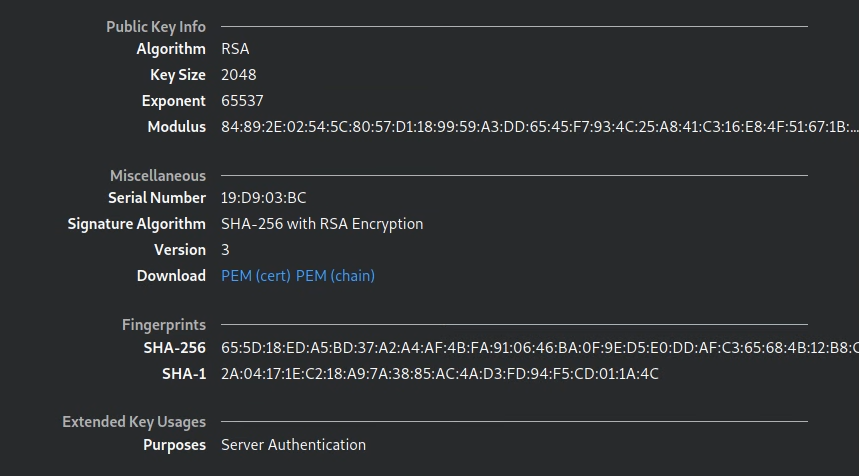
Inspect the cert. You can do this by clicking the “View Certificate” button.
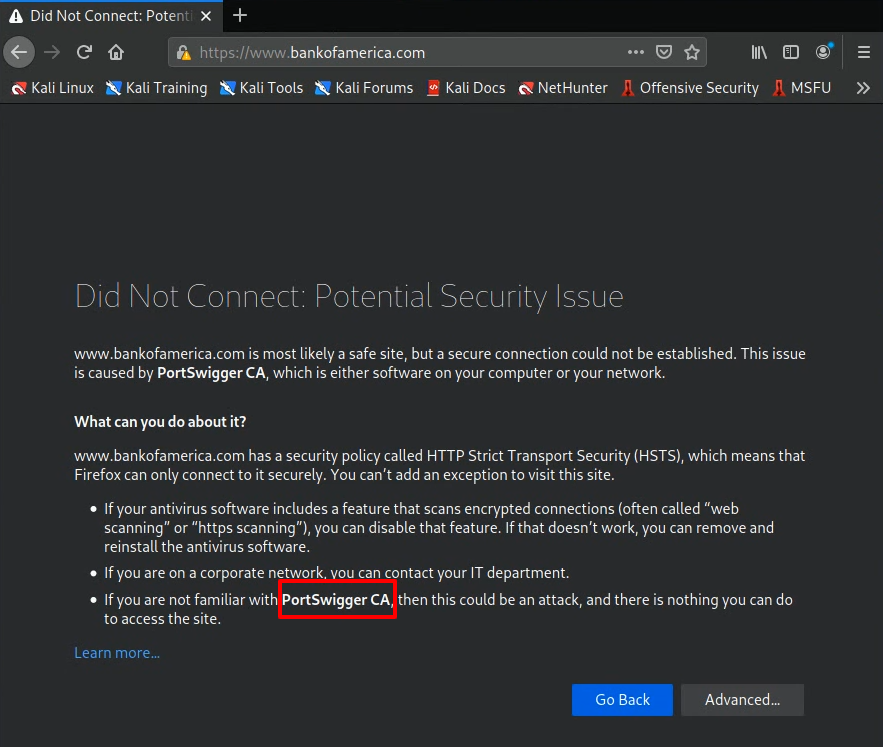
-
Alternatively, you can copy the base64-encoded version and use a web cert decoder. To do this, on the SSL error page, click “Advanced”, then click the link to the error code. Copy the —BEGIN CERTIFICATE– block to your clipboard.
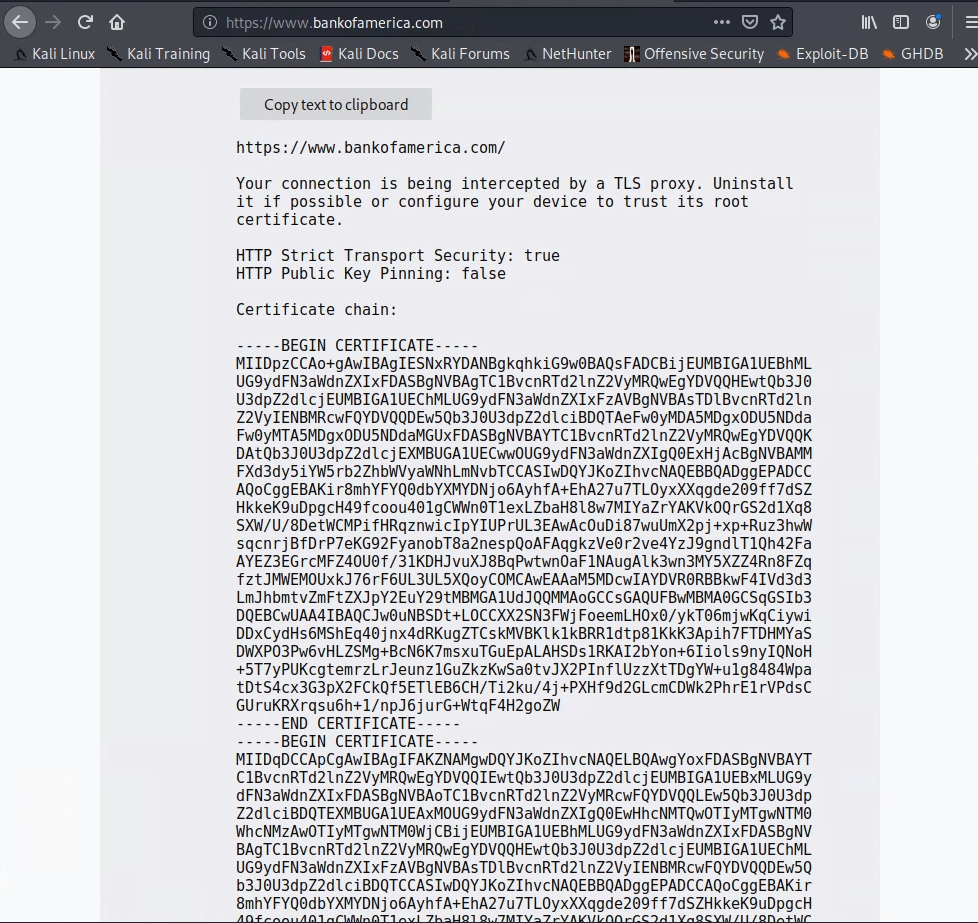
Search the internet for an “ssl cert decoder”, such as https://certlogik.com/decoder/ or https://www.sslshopper.com/certificate-decoder.html, to decode the base64-encoded cert that you copied in the previous step. You can use Kali’s Firefox to do this.
-
-
Configure Firefox to trust Burp Suite’s self-signed certificate.
Burp Suite generates a unique ssl keypair for each installation. We need to instruct Firefox to trust Burp Suite’s public key for authenticating websites. As seen earlier in this lab, Firefox maintains its own certificate authority list.
Follow the instructions on this Burp Suite website to install Burp Suite’s CA certificate into Kali’s Firefox.
Note: The linked-to instructions above show Burp Suite Professional, but the instructions also work for Burp Suite Community Edition. You don't need to install another version of Burp Suite than the one that is already installed on your Kali VM.Note: When the instructions say, "In the top-right corner of the page, click "CA Certificate" to download your unique Burp CA certificate. Take note of where you save this.", you should choose "Save File", and your file will be downloaded with filenamecacert.der.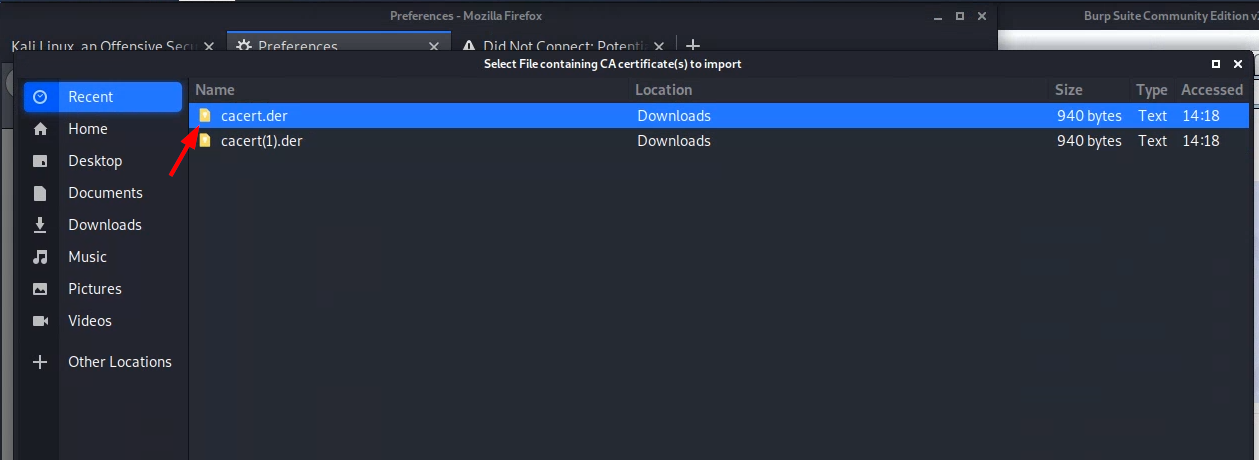
-
Use Firefox again. Close the Bank Of America error page, and use a new tab to attempt again to navigate to https://bankofamerica.com
It loads!
Examine the HTTPS SSL connection:
- In the Firefox address bar, click the lock next to url.
- click the
>button on the resultant popup dialog - click
More Information
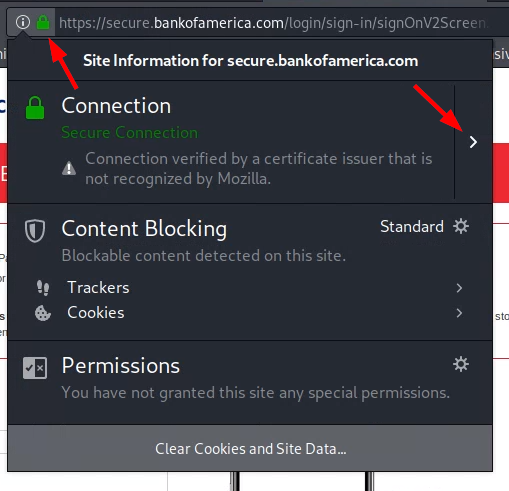
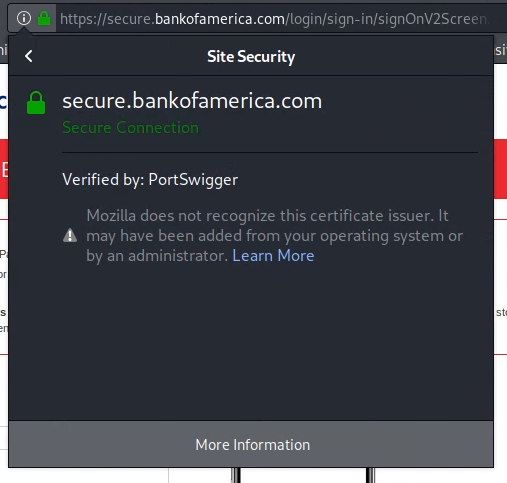
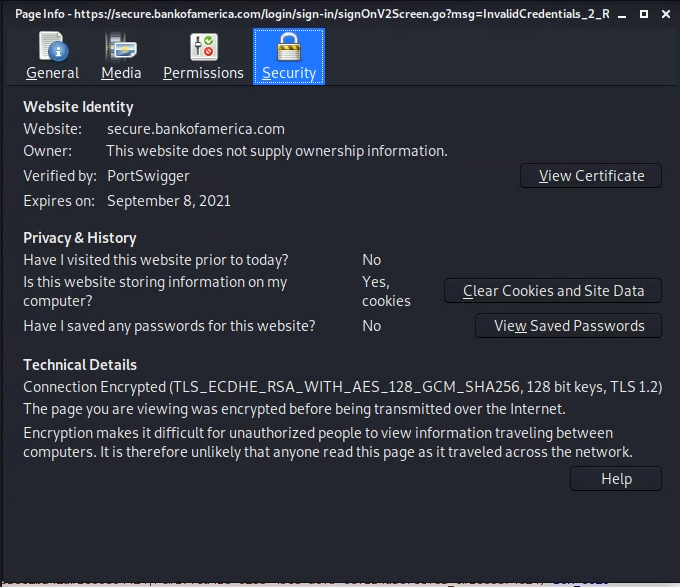
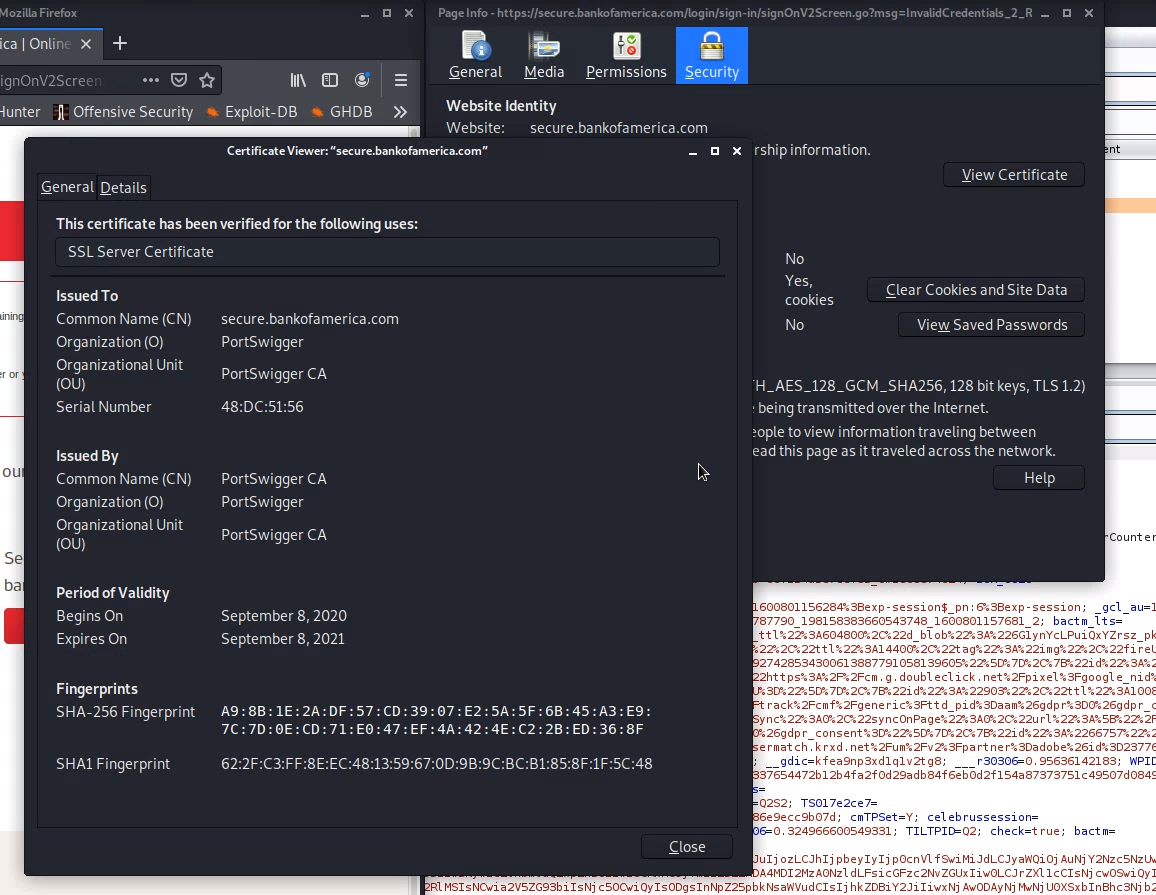
Capture Login
-
Pretend that you are logging in to Bankofamerica.com. Enter your University ID as your username. Choose any fake password. Submit your login request. It will fail.
-
Burp Suite should have logged the login attempt – Let’s find it. Go back to Burp Suite.
-
Within Burp Suite, navigate to the “Proxy” > “HTTP history” tab. Click the “Filter” bar to open the filter dialog, and change the settings as follows to make the visual search easier.
- Login requests submit fields such as usernames and passwords using “parameters”, so select “Filter by request type” > “Show only parameterized results.”
- Login requests – at least for this site – use MIME type “html”, so in “Filter by MIME type,” uncheck all except for HTML.
That should be sufficient to easily find the HTTP POST request which was the attempted login.
A POST request allows parameters such as the username and password to be sent in the body of the web request.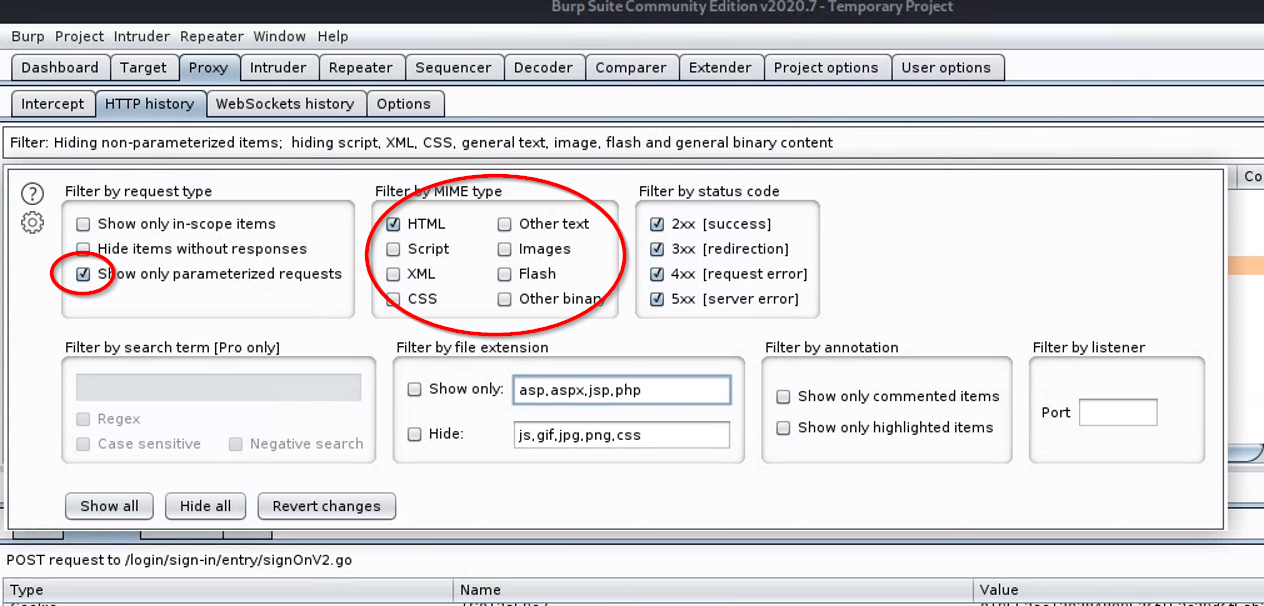
- Look for and select (click) the entry with:
- a POST method
- a URL similar to
/login/sign-in/entry/:
Select it. Information about the request will populate into the view below.
-
If the “Inspector” pane is not already visible, click to expand it.
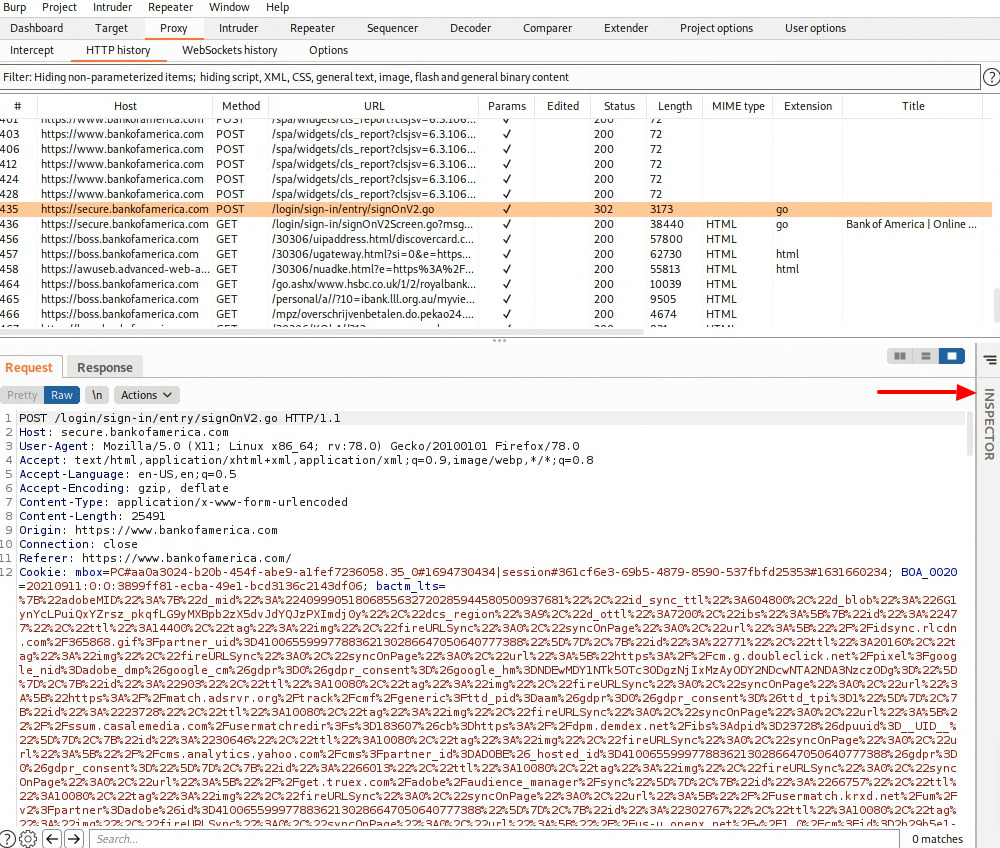
The Inspector view will show, among other things, parameters submitted as part of POST HTTP requests (termed “body parameters” in the interface).
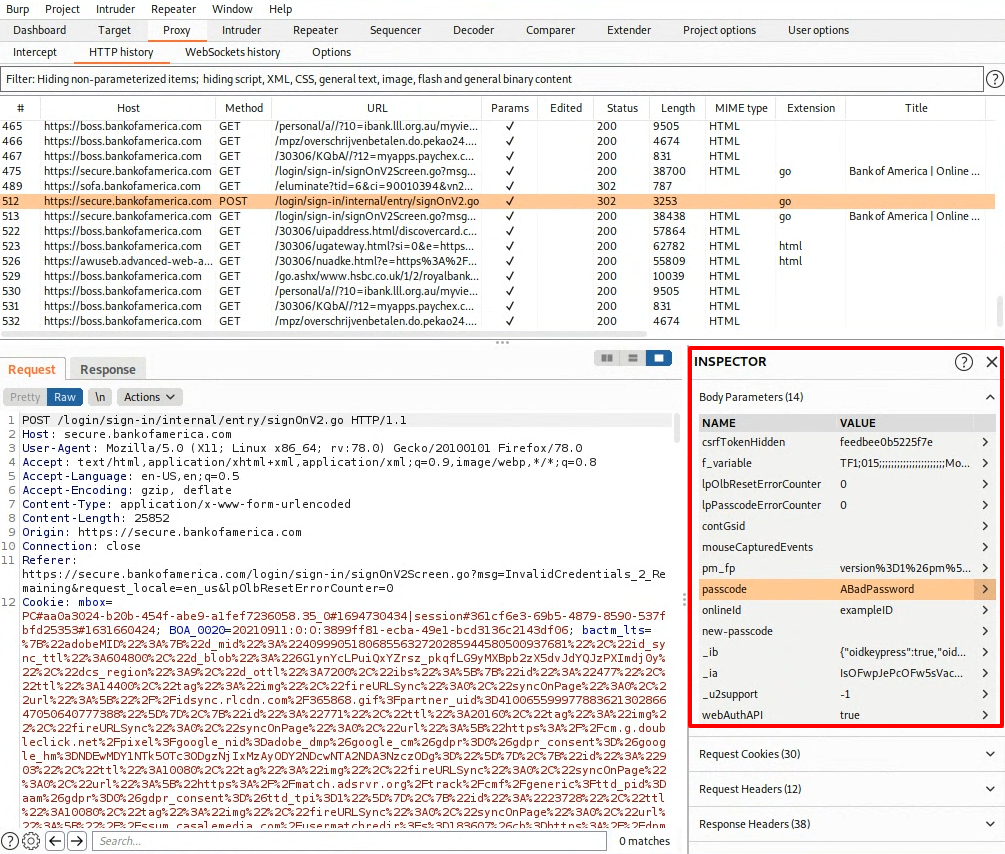
Look through the list of body parameters until you see entries for “onlineid” and “passcode”. These should be the values you submitted on your login attempt.
You should see the University ID and fake password that you submitted.
Question : Submit a screenshot showing your username and fake password within the Burp Suite window for the Bank of America login attempt. Show your entire Kali view in your screenshot. Example screenshot below.
-
-
But wait, this was an HTTPS connection, so the web transaction such as the submitted username|password) should have been encrypted. How could Burp Suite have decrypted it?
This is the essence of a man-in-the-middle attack – a secure connection to an evil server which talks to your intended server on your behalf.

In our pretend case, Burp Suite is the evil server, and Bank Of America’s server is the intended server. All secure content is visible as plaintext to the attacker, because the attacker’s SSL cert was used to establish the secure HTTPS connection.
-
Finally, clean up by reconfiguring Firefox to no longer use a network proxy. To do this, revisit Firefox’s “Network Settings” page under the Preferences view, and select “No Proxy”.
Part 3. Appreciate secure messaging with the bygone PGP
For a long time, PGP was the best technology available for messaging (email) privacy.
To gain an appreciation of the pain involved in using PGP, watch the following
video tutorial created by Edward Snowden for how to use gpg,
the open source version of pgp: https://vimeo.com/56881481
You do not need to follow along, but you may if you want to, for your health. The above video tutorial is for Windows users. For Mac, the GPG Suite can be used.
Part 4. Understand Secure Communication via Signal
The Signal app and Signal protocol intend to make pgp-like levels of message confidentiality invisible to the end-user. This section intends to orient you to the Signal app and protocol.
- Watch the following interview clips from an Al Jazeera Fault Lines documentary about the
crypto wars:
- Interview with Moxie Marlinspike starting at 9:00, but start at 8:23 for context
- Many attacks that do not depend on cracking E2E, Interviews with Morgan Marquis-Boire at 16:18 and Bill Marczak of The Citizen Lab at 18:37
- Watch this video and read about the Signal app here and here.
- Also read about the cryptographic primitives that the Signal protocol uses, here.
Use what you read and watched above to answer the following questions:
